
Note
For the most intuitive experience, you can try the Simulator directly on the Homepage.
I.General Introduction
OneChanger has 4 main functions to note:
-
CHANGE DEVICE: Change device information (Model, Brand, IMEI, Android ID...).
-
WIPE: Clear application data, clean the app for the next run. (In some cases, if WIPE doesn't feel clean enough, you can refer to the CHANGE & FACTORY function below).
-
BACKUP: Save device information, app data, Google data...
-
RESTORE: Used to restore backed-up data.
II.Change Device
There are 3 ways to perform Change Device:
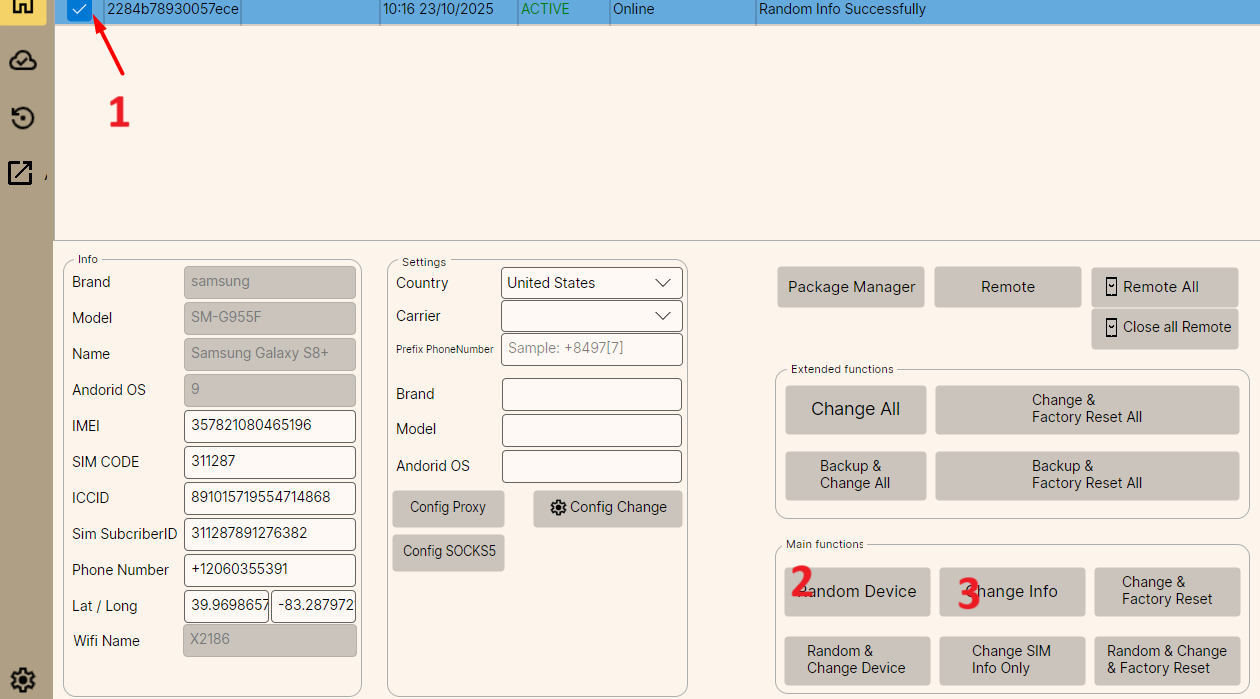
1Method 1: Manual Change
- Check the device you want to change.
- Click Random Device to generate random information.
- Then click Change Info and wait for the device to change automatically.
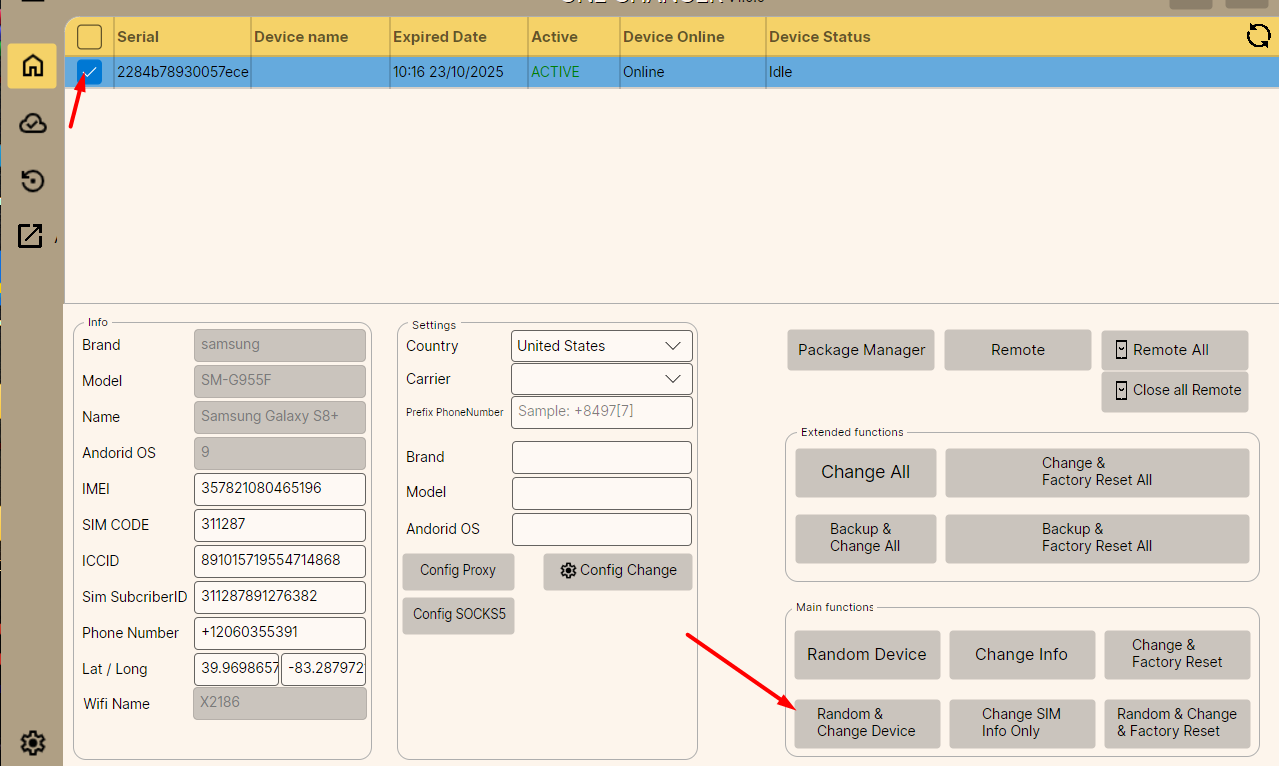
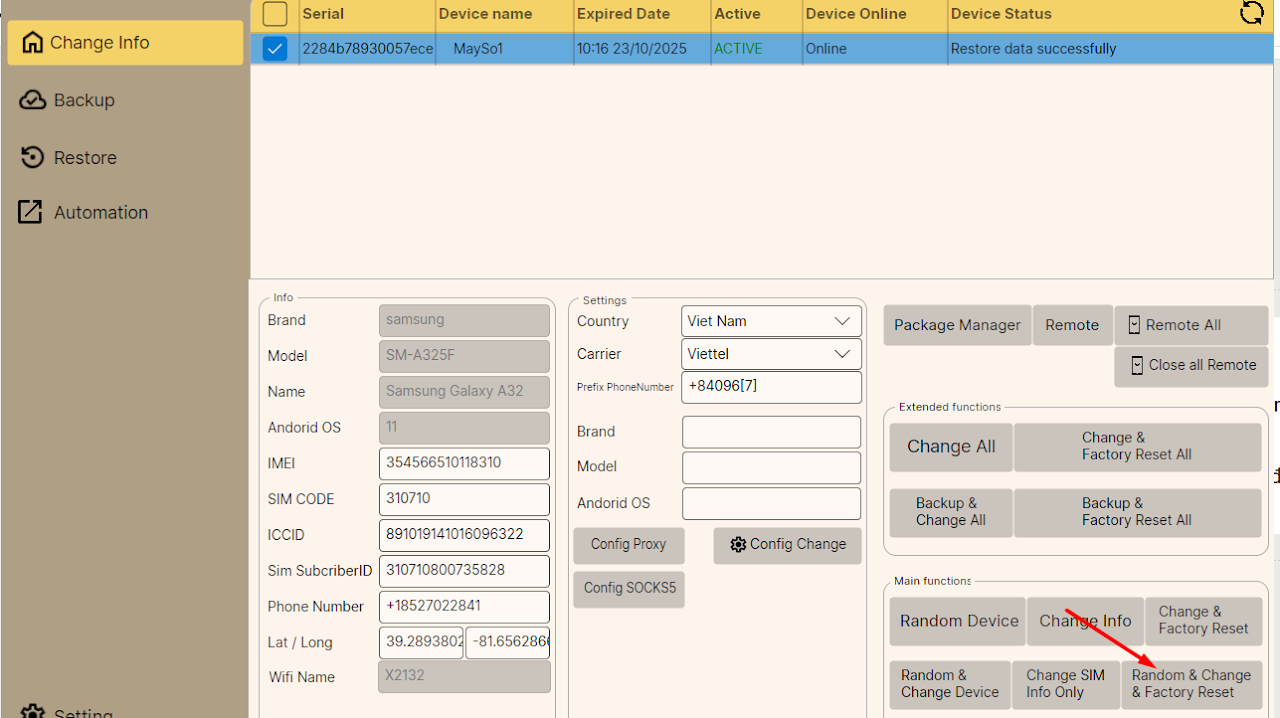
2Method 2: Random & Change (Commonly Used)
- Check the device you want to change.
- Click Random & Change Device for the software to automatically Random and Change at the same time.
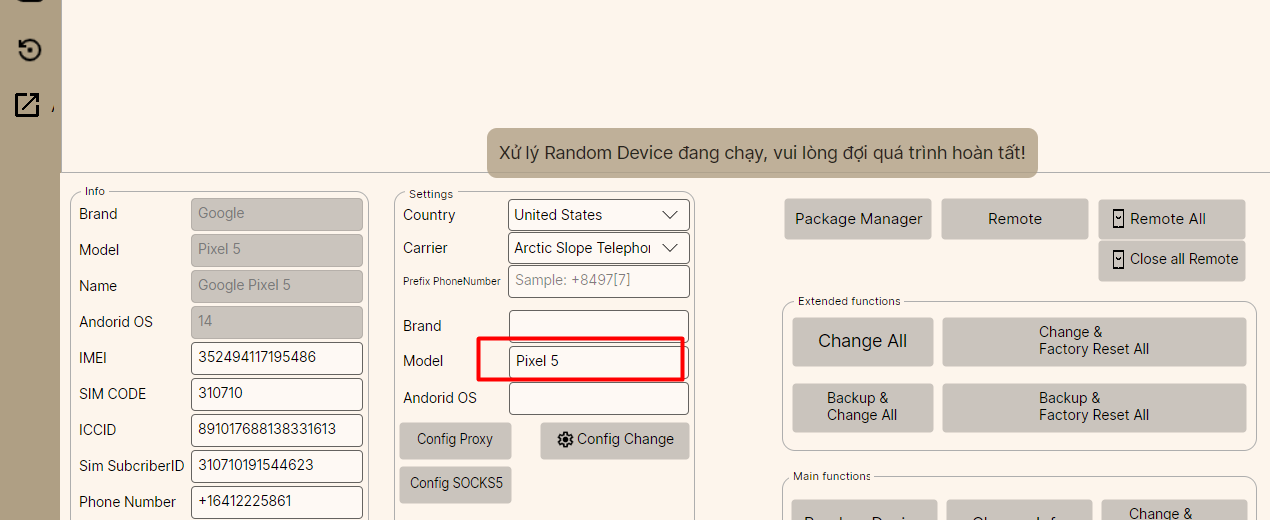
3Method 3: Change with Fixed Configuration
Used when you need to change according to a fixed: Model, Brand, or Android OS.
- Fill in the information in the Settings box.
- Then click Random & Change Device to change.
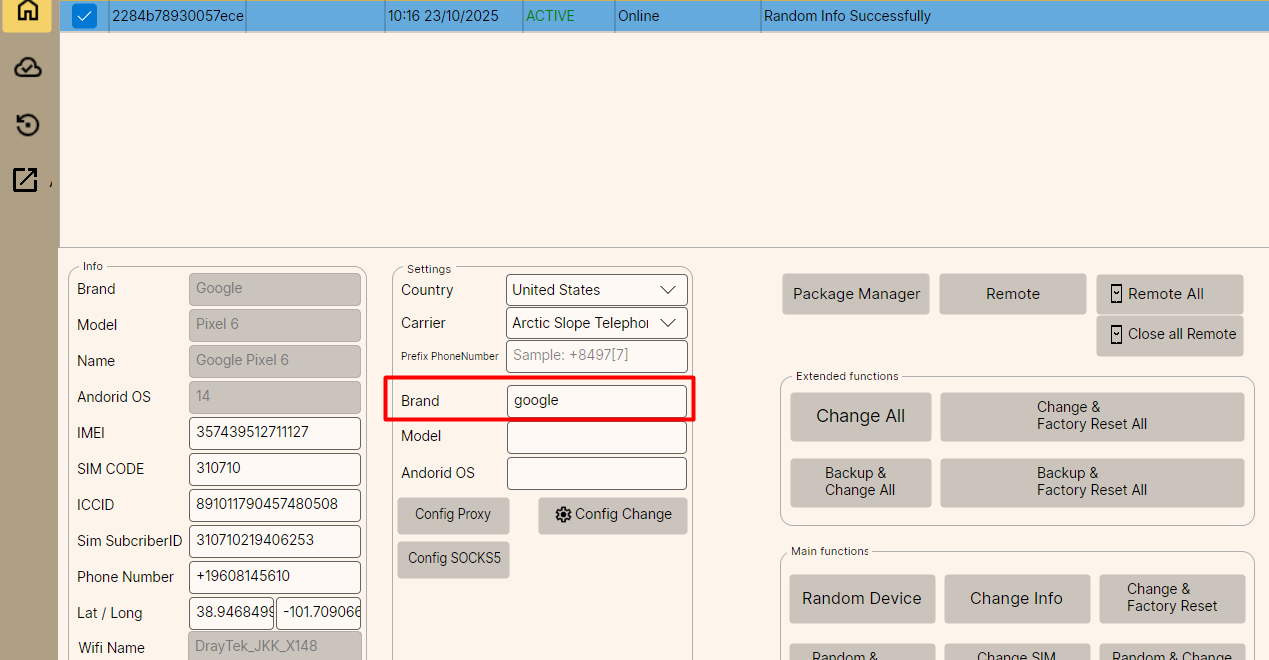
Configuration Examples:
- Fixed Brand: Enter
googleto always change to Google Brand.
- Fixed Model: Enter
Pixel 5to always change to Pixel 5 Model.
- Fixed Android OS: Enter
14to always change to Android 14.
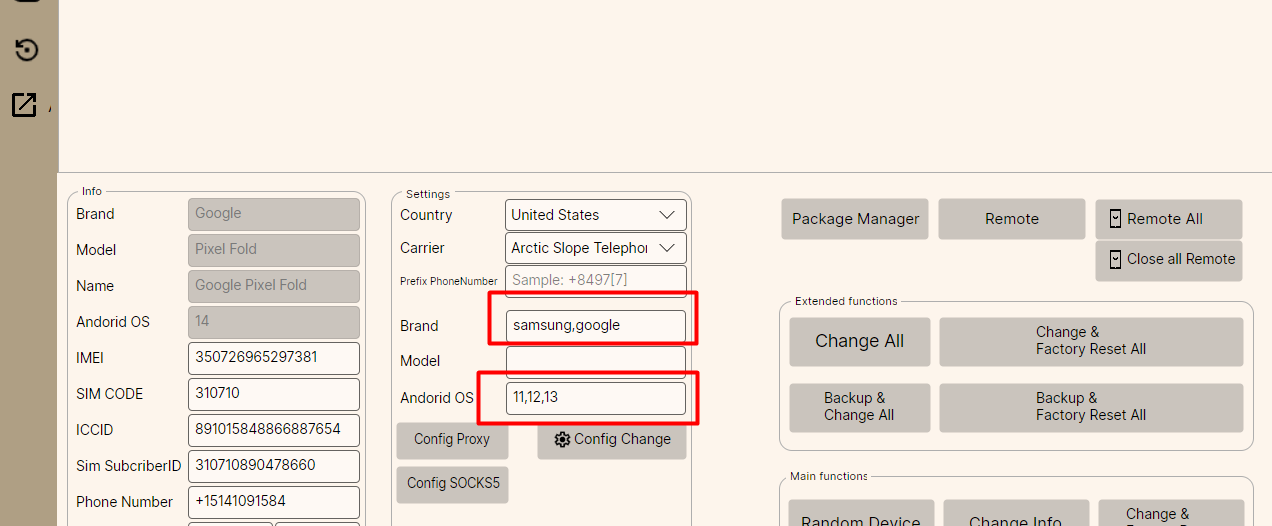
- Combination: You can set multiple conditions, e.g., specify software to only change to devices of
samsung,googleand Android OS11,12,13.
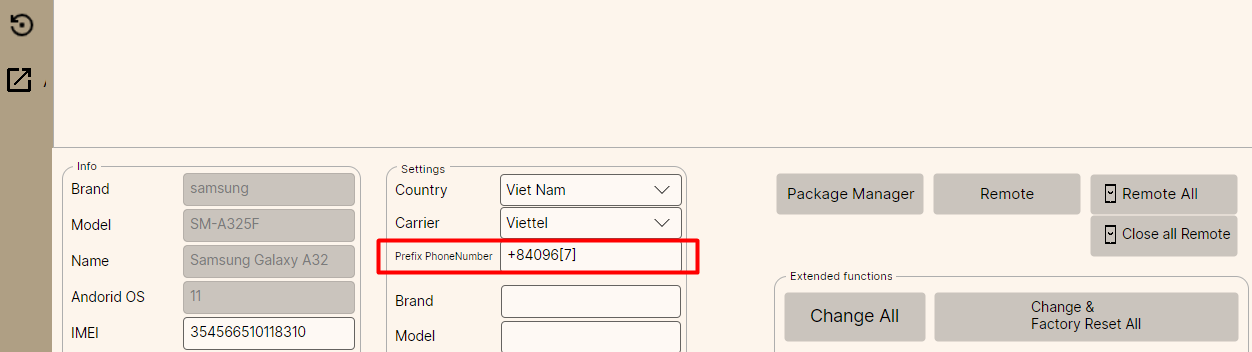
Prefix PhoneNumber (Fake Phone Number Prefix):
- Used to fake a fixed phone number prefix.
- Example: Enter
+84096[7], the software will fix the prefix096, country code+84, and randomize the following7numbers (result:096*******).
Important Note
The information needed for fixed change (Model, Brand, Android OS) must exist in OneChanger's database. Entering a device not present in OneChanger will report an error.
III.WIPE & Uninstall
Distinguish between WIPE and Uninstall:
- WIPE: Deletes app data but keeps the app on the device. (Pros: No need to reinstall the app. Cons: May not be as clean as complete removal).
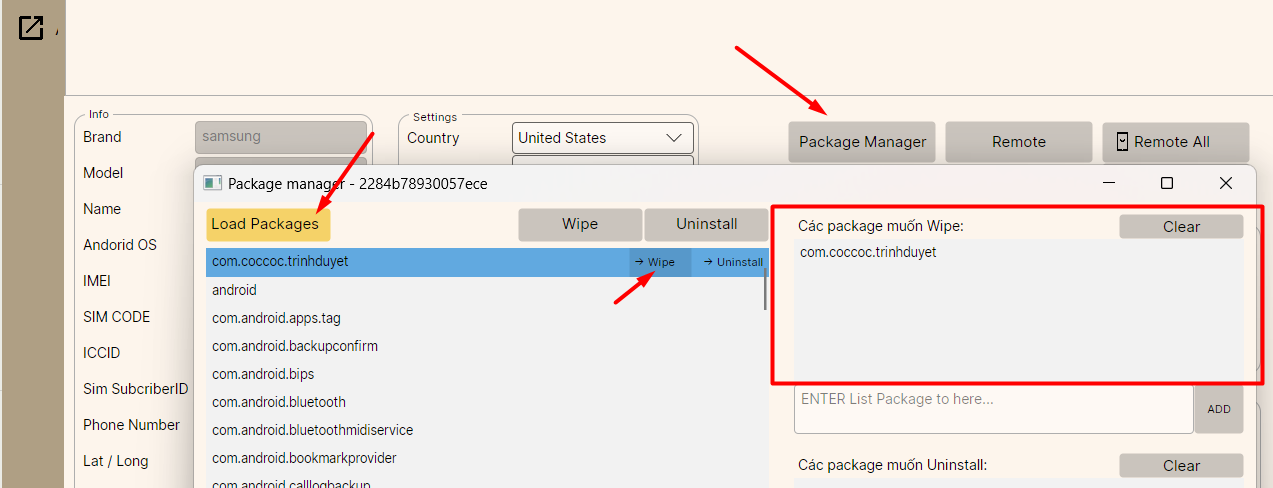
- Uninstall: Removes both data and the app from the device. (Pros: Cleaner than WIPE. Cons: Must reinstall the app).

Advice
Depending on usage needs, some apps only need Wipe to continue, while others must be uninstalled and reinstalled. However, some "stubborn" apps install deep inside the system, making both methods incomplete. In that case, please refer to the Factory Reset feature below.
1. Configure WIPE
To configure the software to clean app data but keep the app:
- Select Package Manager -> Load Package.
- Select the package of the App to WIPE.
- Click the arrow Wipe to add that app to the "Packages to Wipe" list.
2. Configure Uninstall
To configure the software to uninstall the app when changing:
- Select Package Manager -> Load Package.
- Select the package of the App to Uninstall.
- Click the arrow Uninstall to add that app to the "Packages to Uninstall" list.
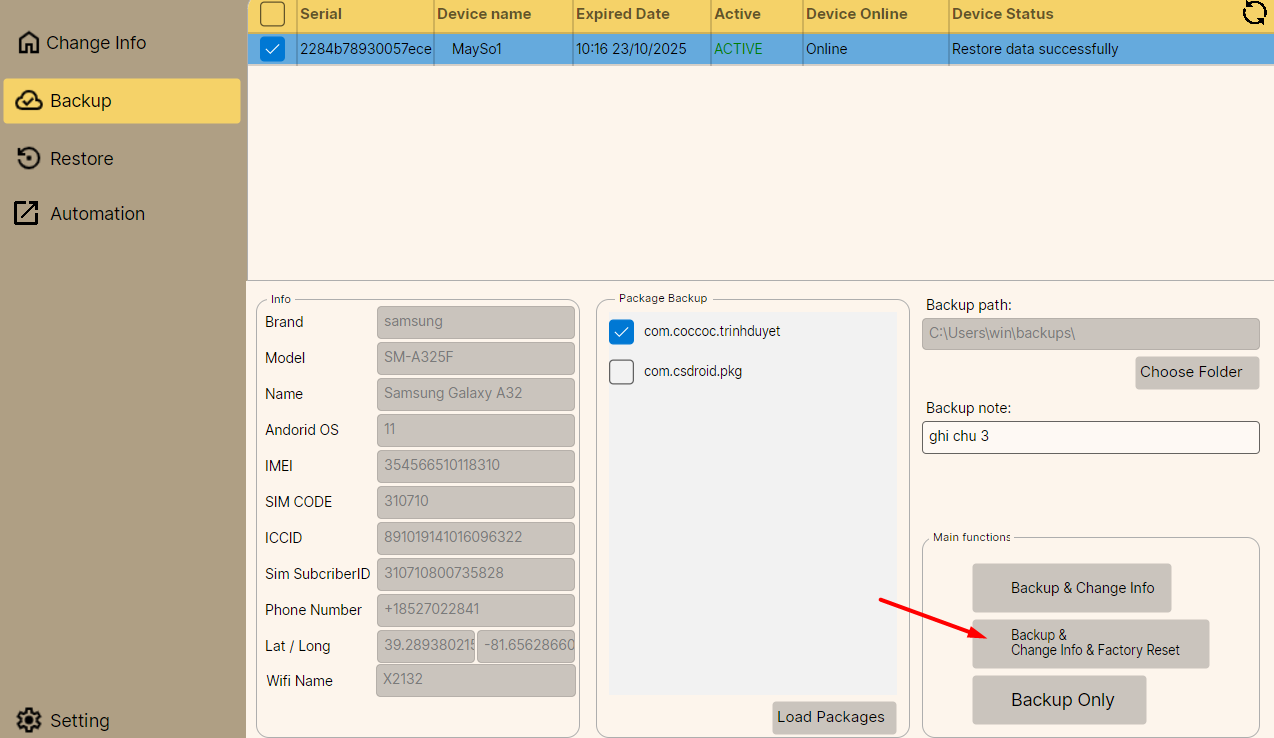
IV.Backup (Data Backup)
By default, the software will backup device info & Google Play Store data. To backup additional work apps:
- Select the Backup tab.
- Check the package of the app to backup.
- Click Backup & Change Info for the software to backup and then proceed to change info.
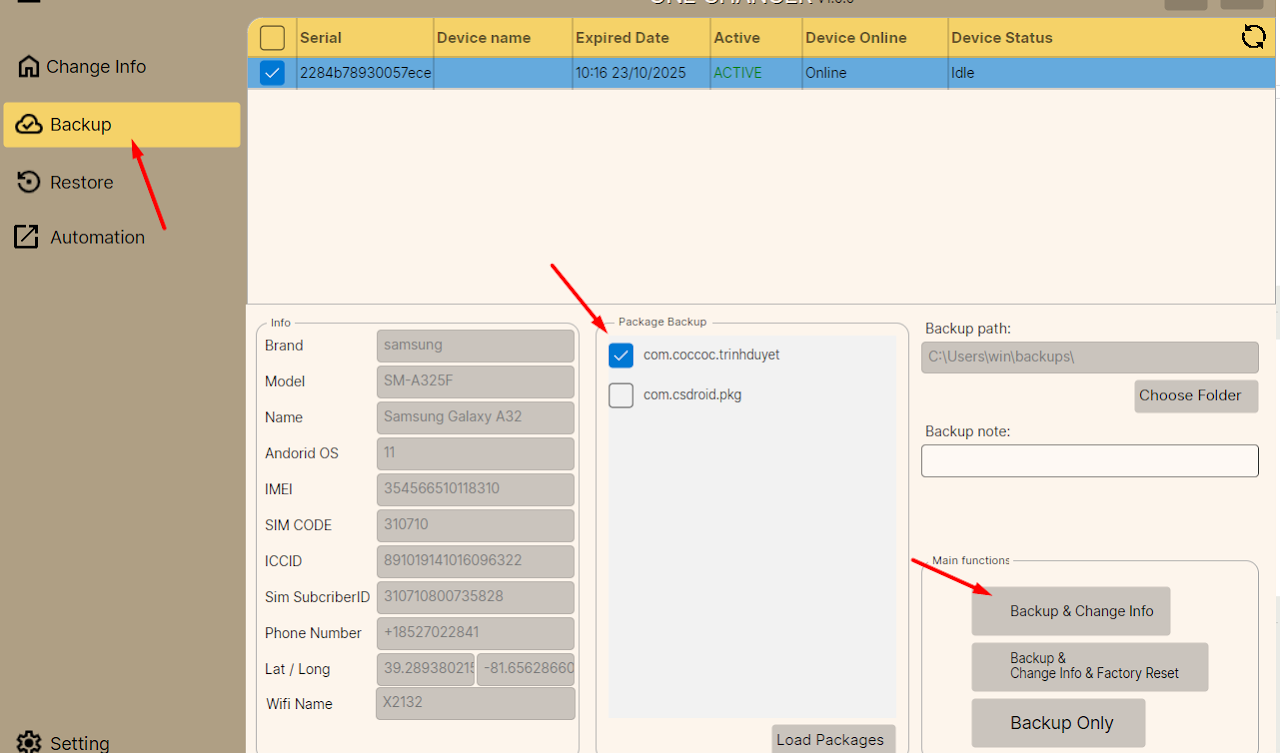
Note
Only check the apps that actually need backup. Do not check all irrelevant redundant apps to avoid heavy backup files and long processing time.
Backup Options:
- Backup Path: Path to save backup files on the computer (can select a folder on another drive).
- Backup Note: Note for the backup file.
- Backup Only: Only perform backup, no change info (rarely used).
- Backup & Change Info & Factory Reset: (See details in the Factory section).
V.Restore (Data Recovery)
Used to restore previously backed-up files.
Usage:
- Go to Restore.
- Select the device to restore.
- Select the file to restore from the list.
- Click Restore.
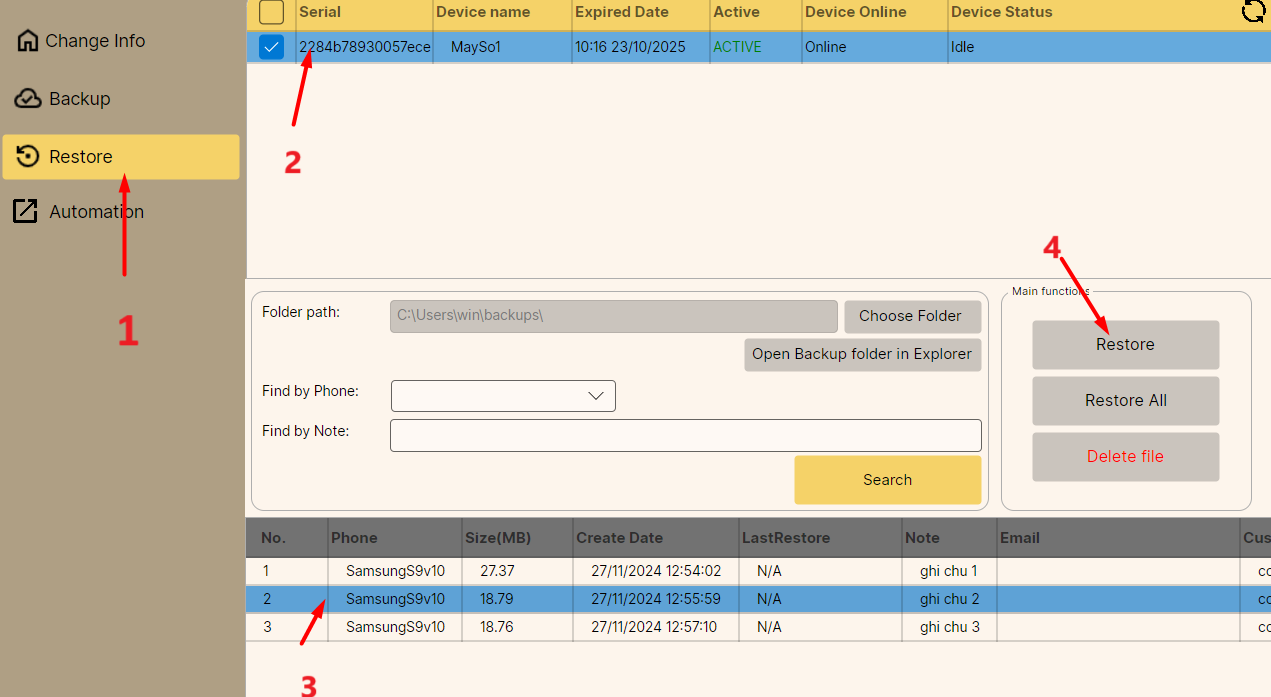
Note:
- Backup files must be of the same device model and ROM to be "cross-restored" to each other. Use Find by Phone filter to filter backup files by model + ROM.
- Find by Note: Search backup files by note content or backed-up Google Play email.
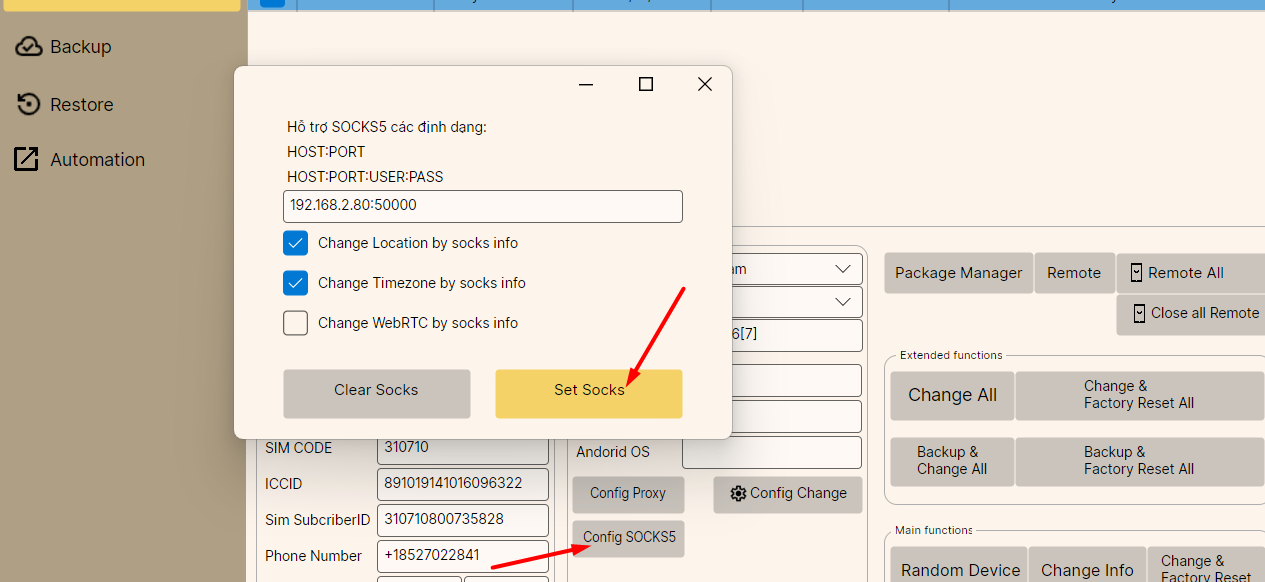
VI.Fake IP (Socks & Proxy)
1. Fake IP with Socks
- Select Config Sock.
- Enter Socks info and click Set Socks.
Advanced Options:
- Change Location by socks info: Fake GPS location according to Socks address.
- Change Timezone by socks info: Fake phone timezone according to Socks.
- Change WebRTC by socks info: Fake original WebRTC IP.
- Note: In some cases, checking this causes Socks not to work, please uncheck. (Check WebRTC IP at browserleaks.com/webrtc).
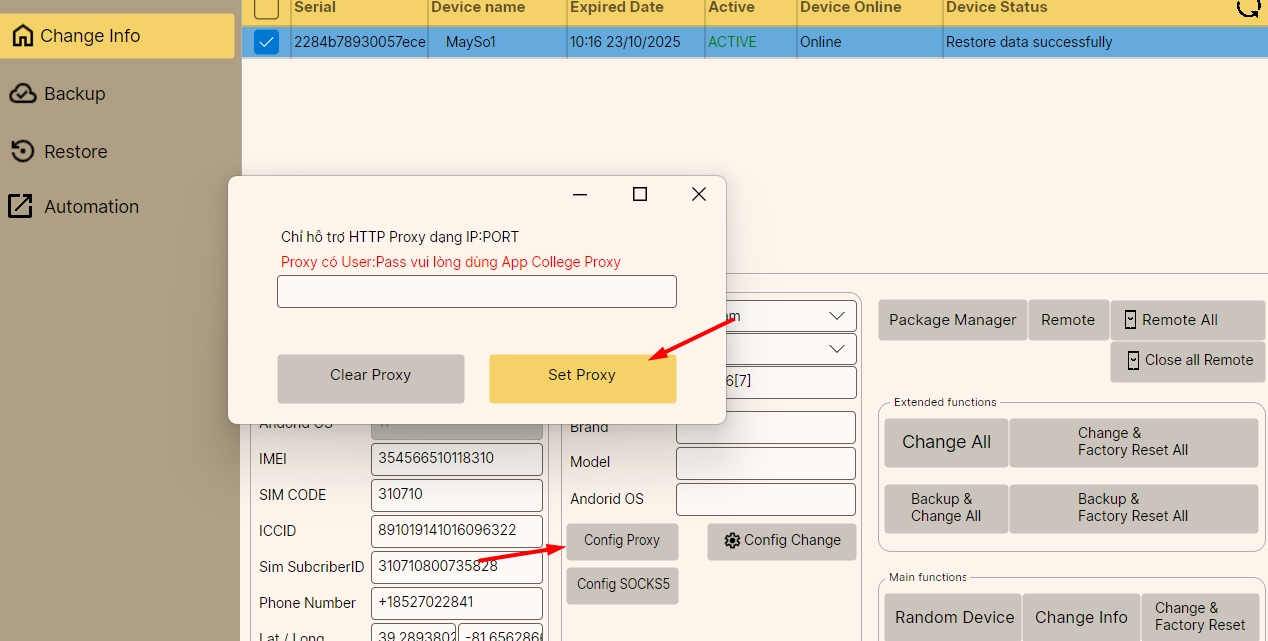
2. Fake IP with Proxy
- Select Config Proxy.
- Enter Proxy and click Set Proxy.
Note about Proxy
This Proxy pointing feature only supports IP:PORT format (Does not support proxy with user/pass).
To use Proxy with user/pass, you need to use 3rd party apps (e.g., SuperProxy, CollegeProxy...) downloaded from Google Play Store.
VII.Factory (Factory Reset)
The Factory function serves to clean as much as possible (only keeping some settings for the phone to continue operating).
- Reason for use: Some apps install deep inside making WIPE or Uninstall not clean enough.
- Disadvantage: Will delete all apps on the phone. Therefore, OneChanger provides an additional Install APK after change feature.
Factory Modes:
- Random & Change & Factory Reset: Random and Change device -> then Factory Reset to clean apps.
- Backup & Change Info & Factory Reset: Backup data -> Change info -> finally Factory Reset.
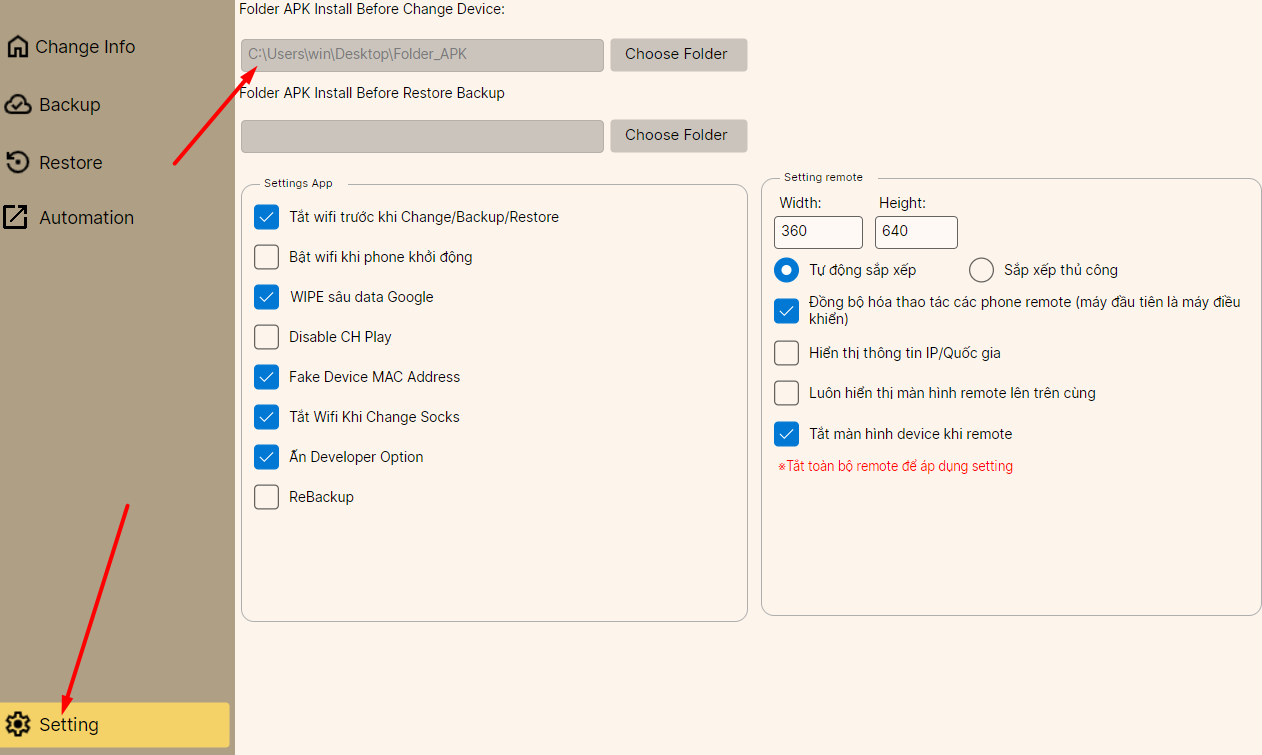
Install App after Change (Auto Install APK)
To automatically reinstall necessary apps after Factory Reset:
- Create a folder on the computer and put the
.apkfiles to be installed into it. - Select the general Setting tab of the software.
- At Folder APK install Before Change Device, point to the created folder.
- The software will automatically install the APKs in that folder every time the machine boots up after Change or Factory.
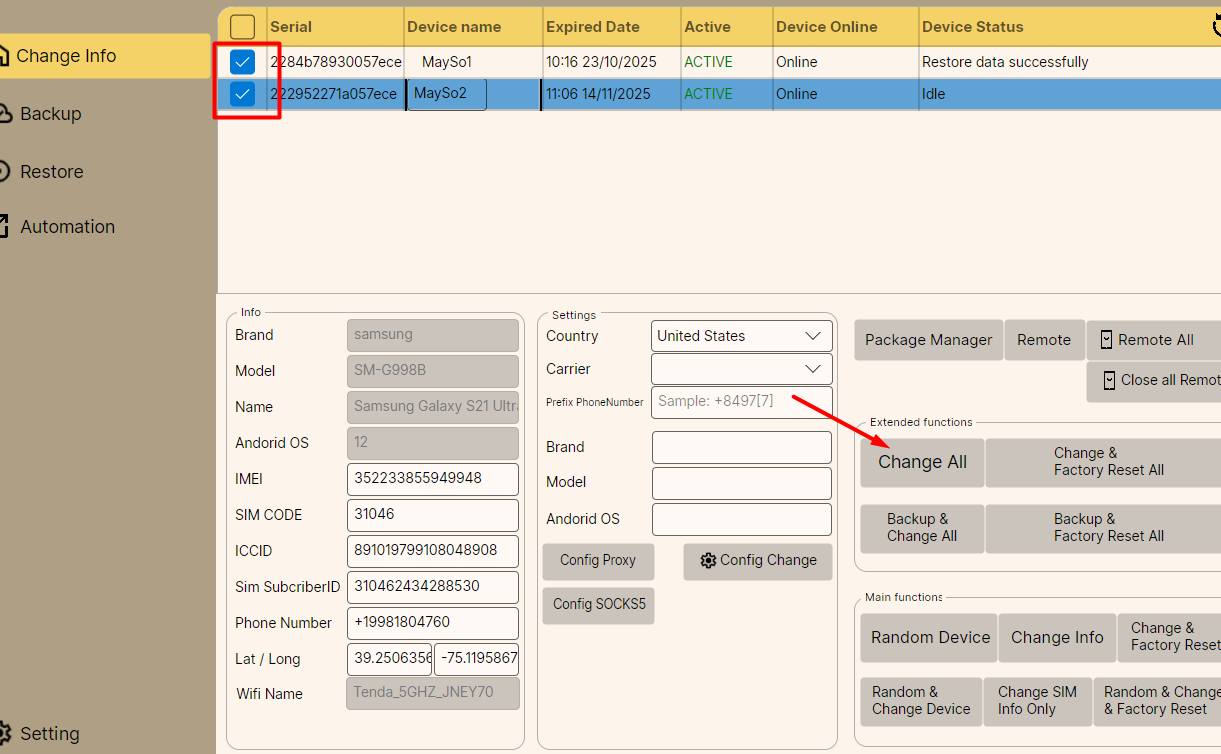
VIII.Change ALL - Backup ALL - Restore ALL
This feature is used to perform simultaneous operations on multiple devices.
- Change ALL: Select multiple devices -> Click Change ALL -> Software automatically Random & Change for all selected devices.
- Backup & Change ALL: Backup then Change info simultaneously for selected devices.
- Change & Factory Reset All: Change info -> Factory simultaneously.
- Backup & Factory Reset All: Backup -> Change info -> Factory simultaneously.
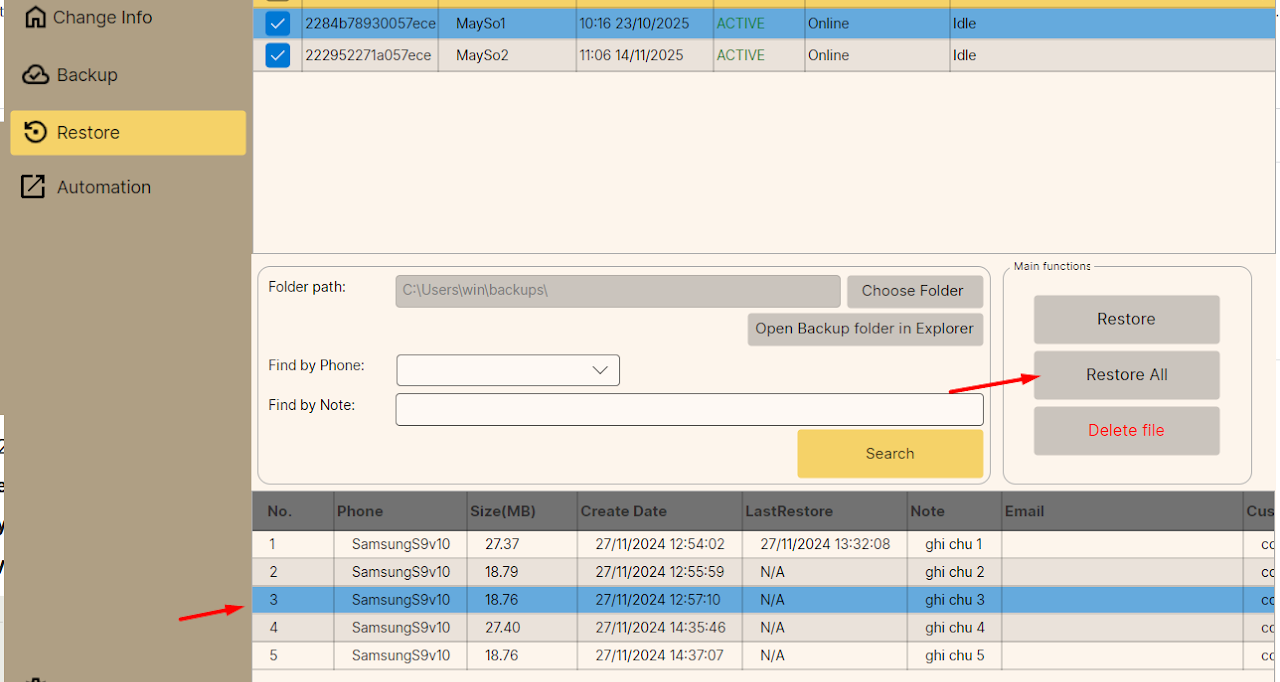
Restore All
Example: You select backup file number 3 and click Restore All.
- The software will not restore file 3 for all devices.
- Instead, it will take files from top to bottom to restore sequentially: Restore backup file 3 for device 1, backup file 4 for device 2, etc.
IX.Other Features
- Fake Location: Fake GPS location to desired coordinates.
- Fake Sock: Support faking various types of socks (e.g., Sock PIA...).