
Using MiChangerPlus
Note
For the most intuitive experience, you can try the Simulator right on the Homepage.
I.Core Functions
MiChangerPlus tool includes 4 core functions you need to know:
- CHANGE DEVICE: Change all device information (Model, IMEI, Serial, ID...).
- BACKUP: Backup current device information, app data, and Google account.
- RESTORE: Restore previously backed up data.
- WIPE: Clear app data start a new session (Clean App).
- Note: If WIPE does not feel clean enough, you can refer to the CHANGE & FACTORY function below.
II.Basic Change Device Guide
Important Notice
During the Change Device, Backup file, or Restore file process:
- Please keep the cable connection between the phone and computer stable.
- DO NOT click randomly.
- DO NOT unplug the cable while the tool is processing.
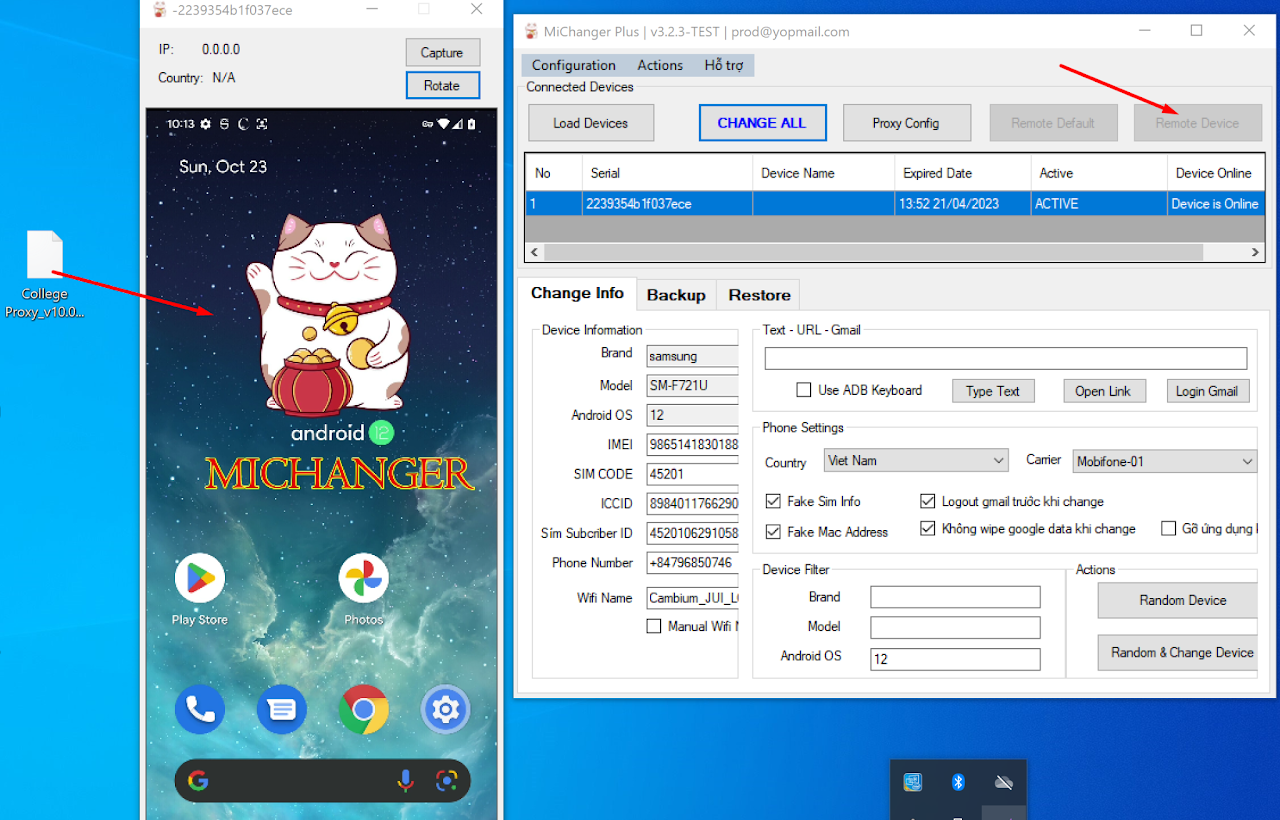
1Step 1: Select Device
At the main interface, select the device configuration you want to simulate.

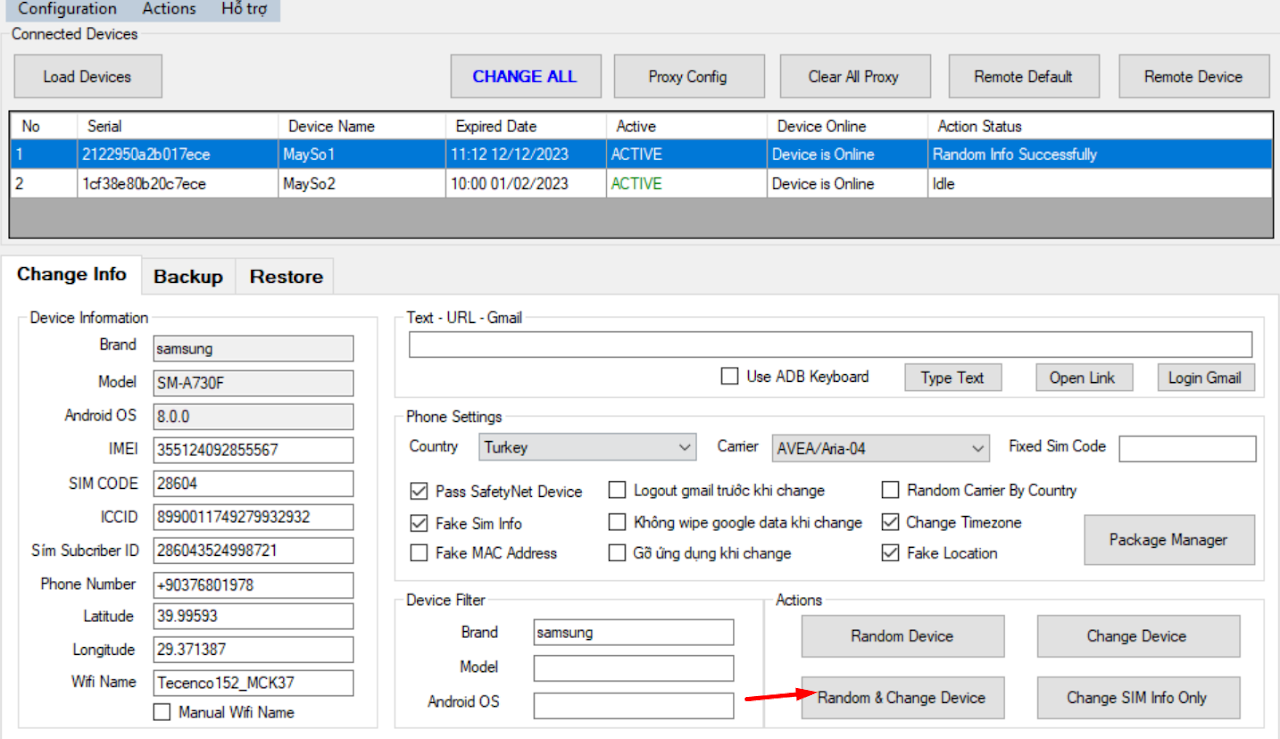
2Step 2: Random & Change
There are 2 ways to perform this:
- Method 1: Click Random Device to generate random info -> Then click Change Device.
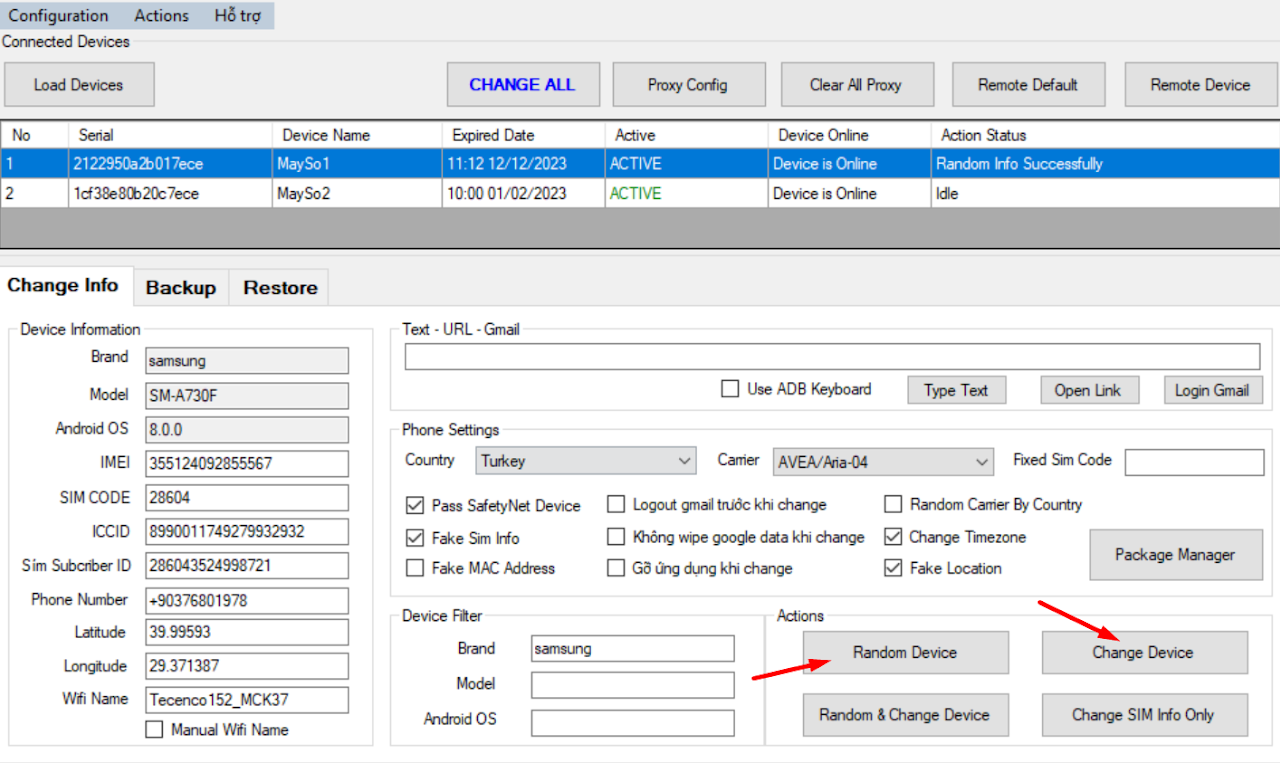
- Method 2: Click the Random & Change Device button to perform both operations simultaneously (Recommended).
III.Advanced Change Options
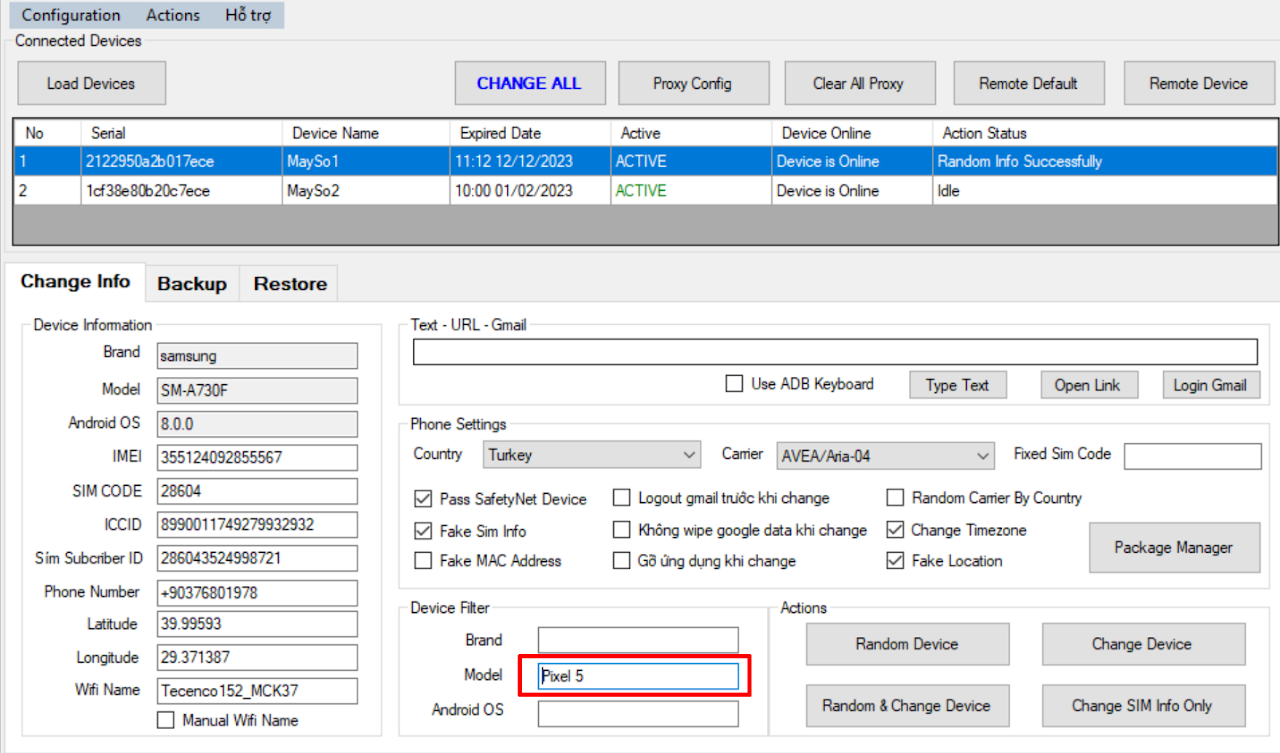
1. Change by Fixed Model
To change to a specific fixed device model (e.g., Pixel 5), fill in the details as shown below:
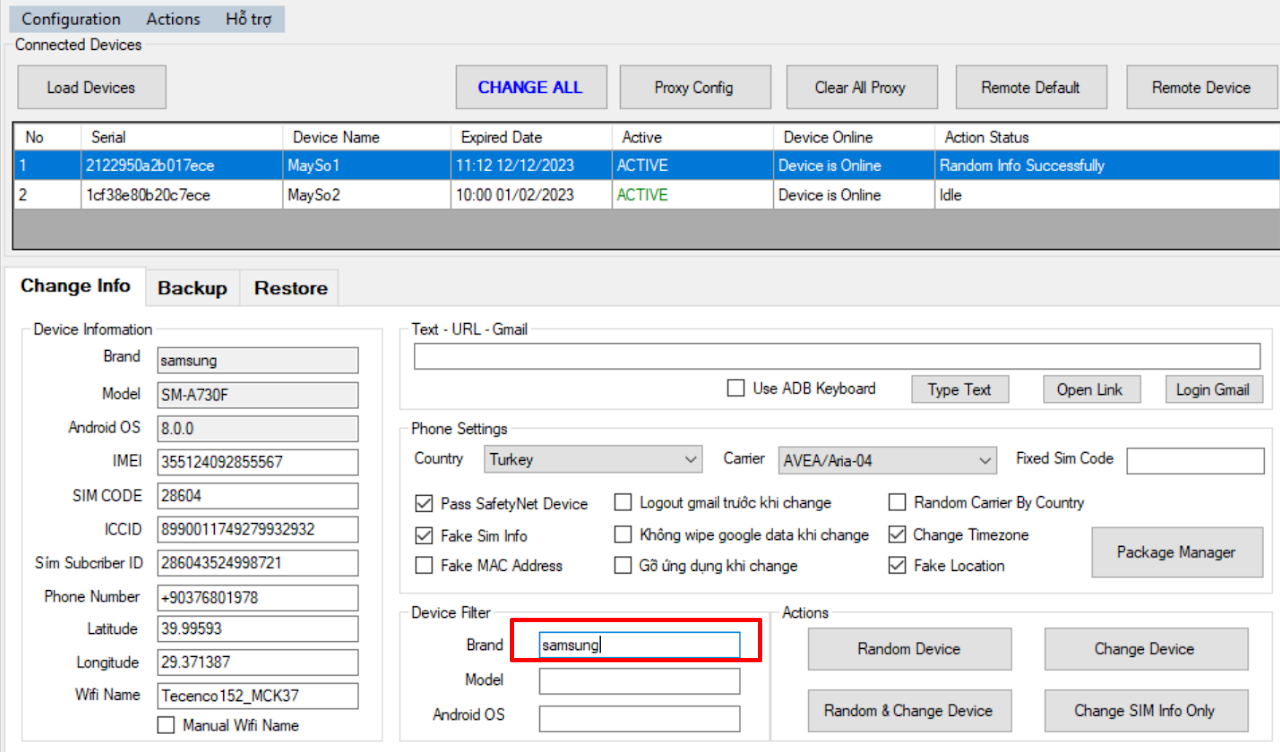
2. Change by Brand
To change to a fixed device brand (e.g., Samsung):
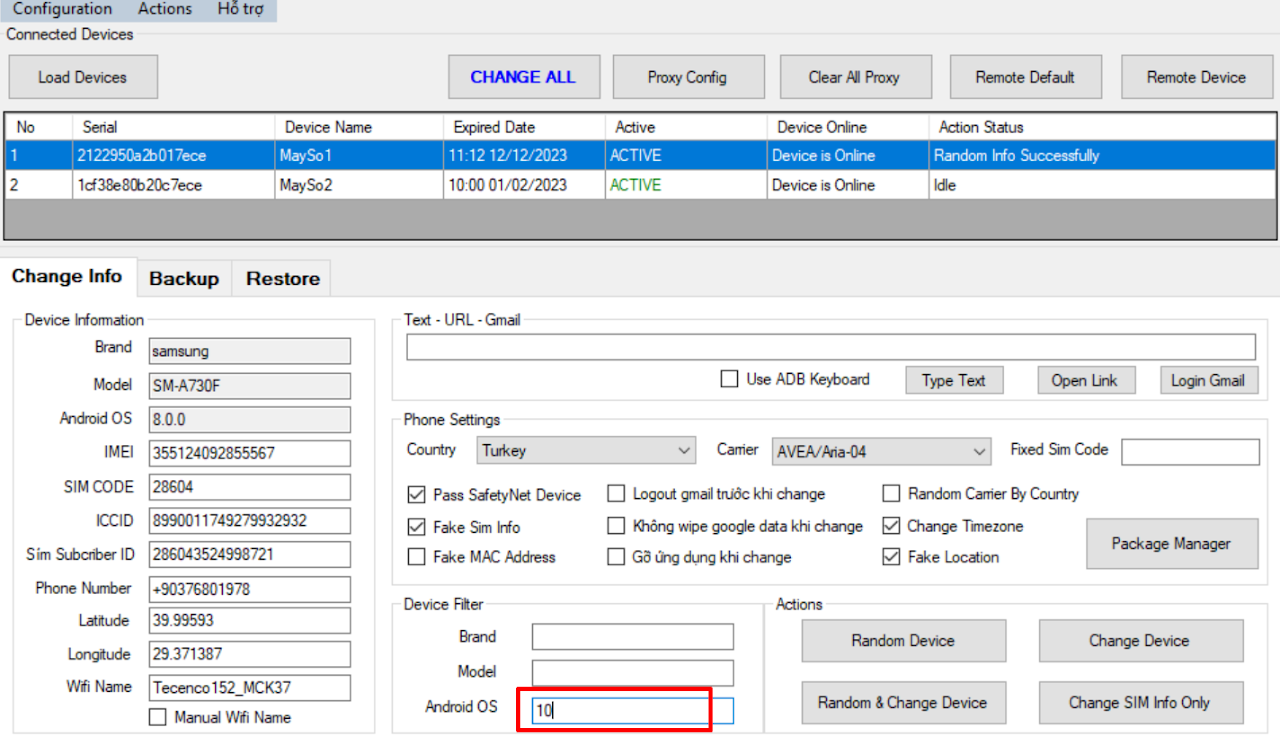
3. Change by Android Version
To change device by Android version (e.g., Android 10):
IV.Backup & Restore Guide
1. Wipe Configuration
- Note: The tool defaults to WIPE Play Store & Google, so if you only want to WIPE Google, no further configuration is needed.
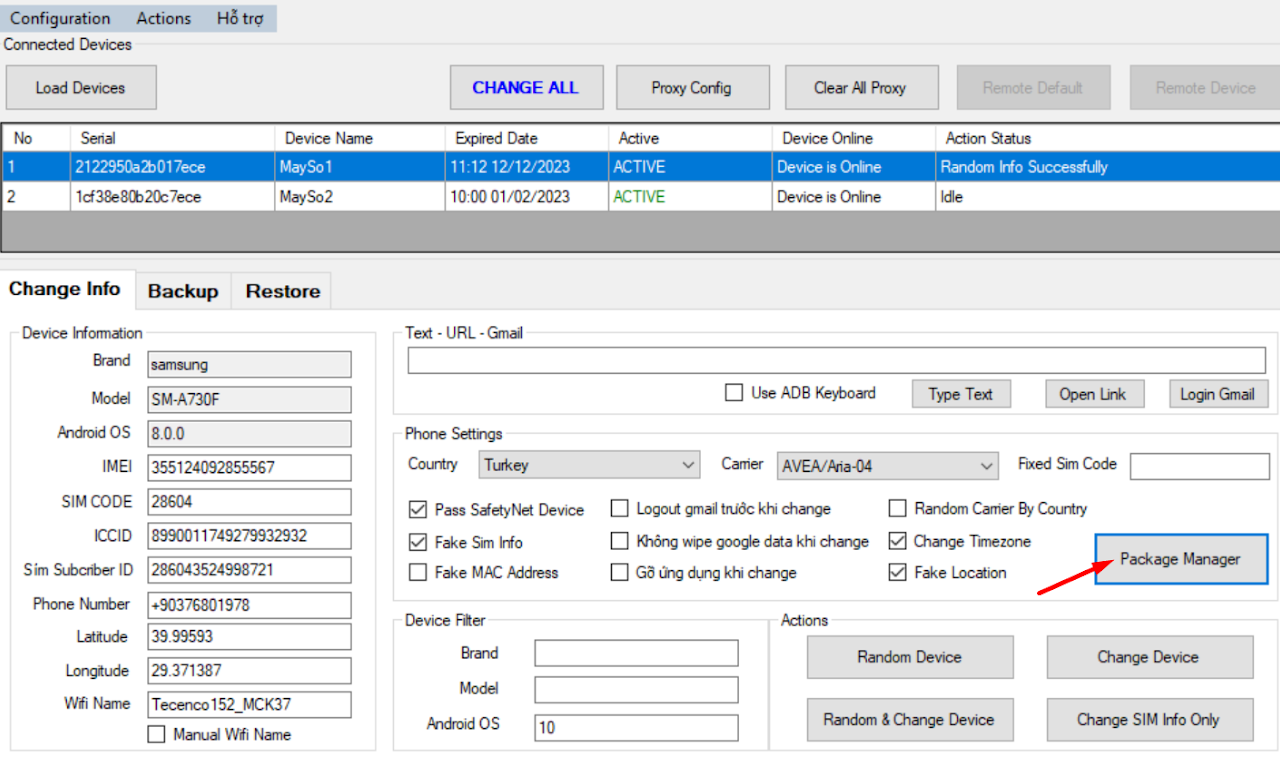
- To Wipe other apps clean (e.g., Cốc Cốc):
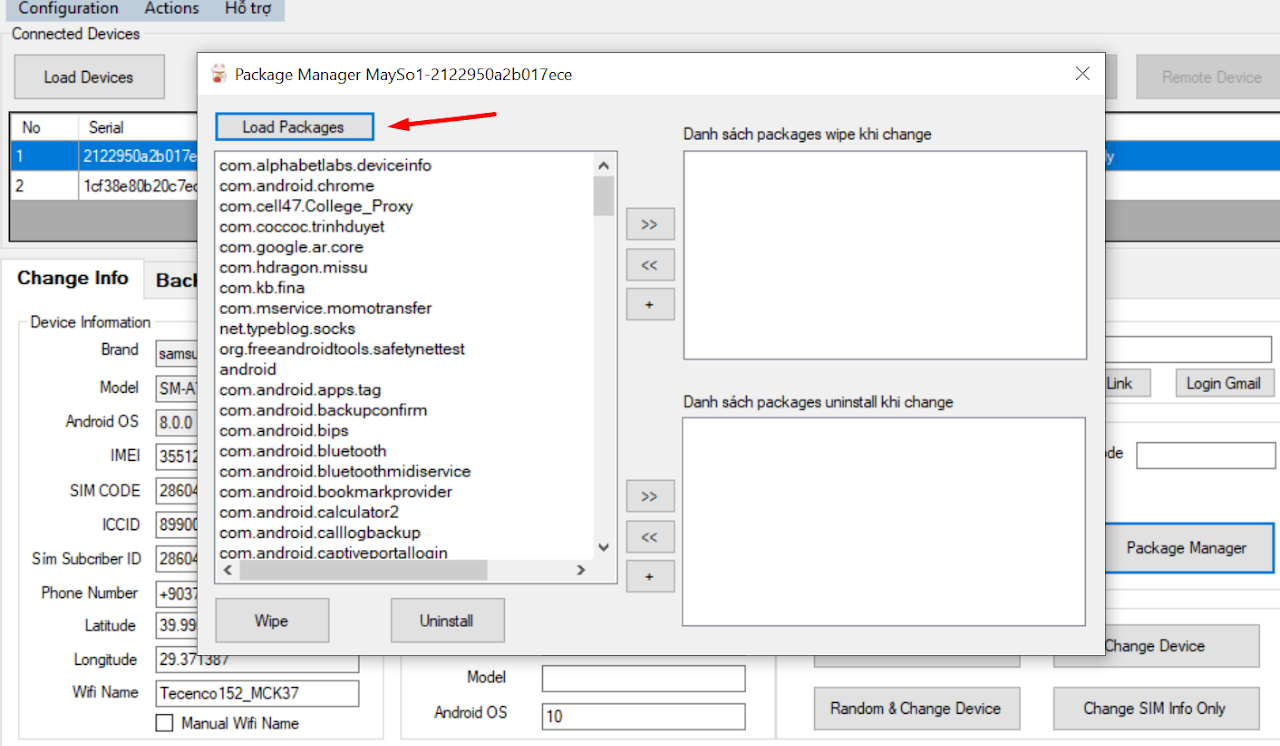
- Open Package Manager -> Click Load device to display apps on the device.
- Select the app to WIPE -> Move that App to the Wipe after changer box.
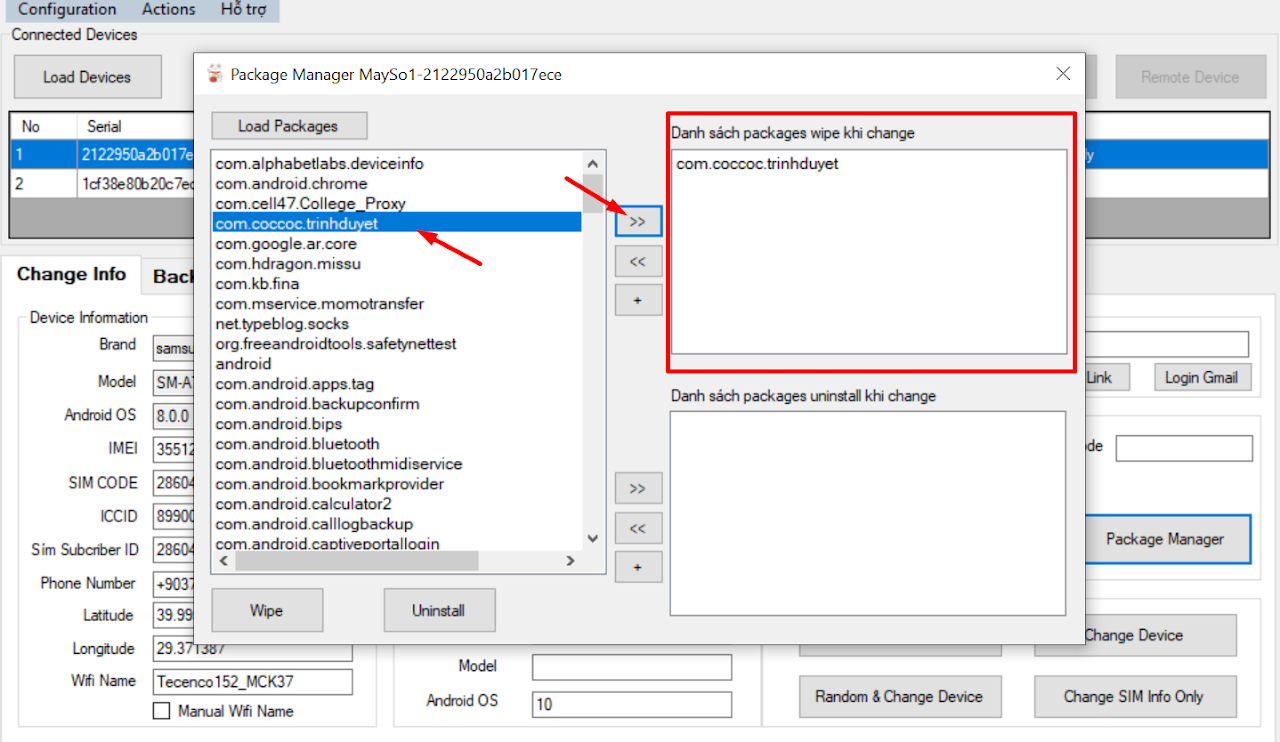
- The tool will now wipe that app when we Change device.
2. Backup Guide
- Note: The tool defaults to Backup Play Store & Google Account, if you only backup Google, no need to tick more.
- Switch the tool to the BACKUP tab.
- Tick the app to Backup -> Click Backup and Change Info.
- The tool will proceed to Backup and automatically Change device.
- Select only necessary apps to backup, avoid backing up too much causing heavy files.
- Backup Only Button: Only Backup, no Change and Wipe device.
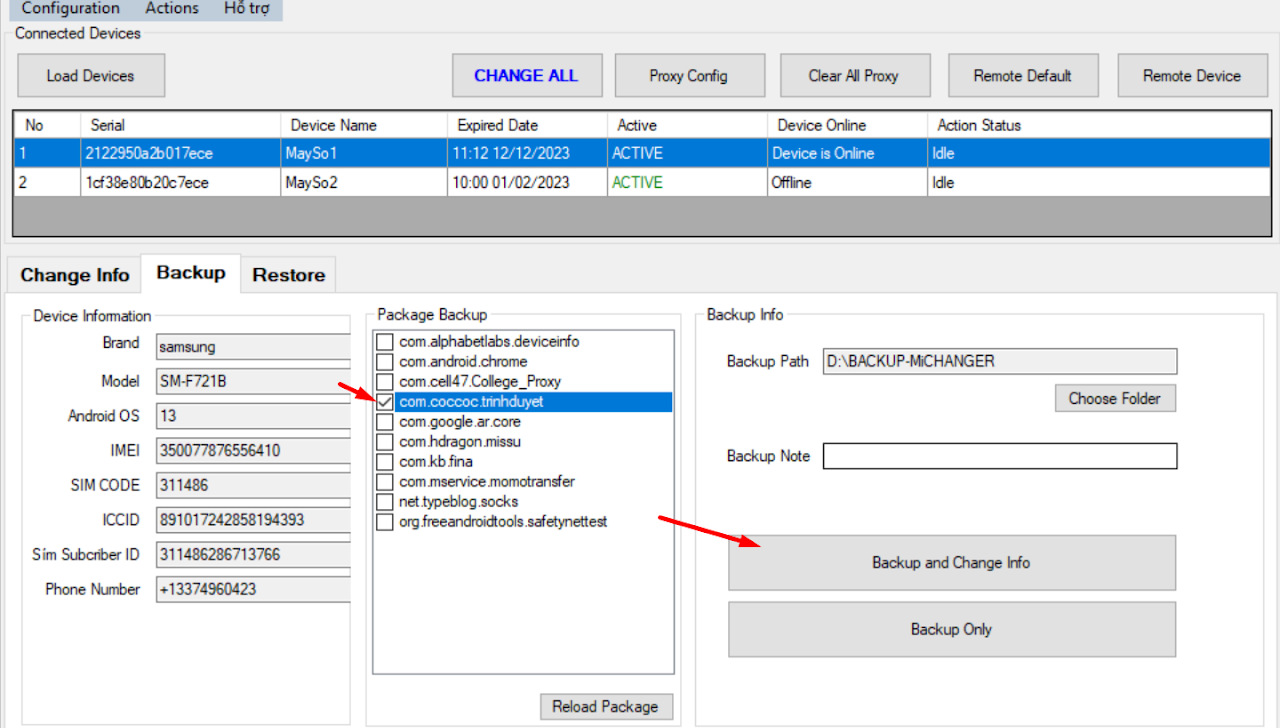
- You can point to the folder containing the backup file or write a NOTE (Unsigned).
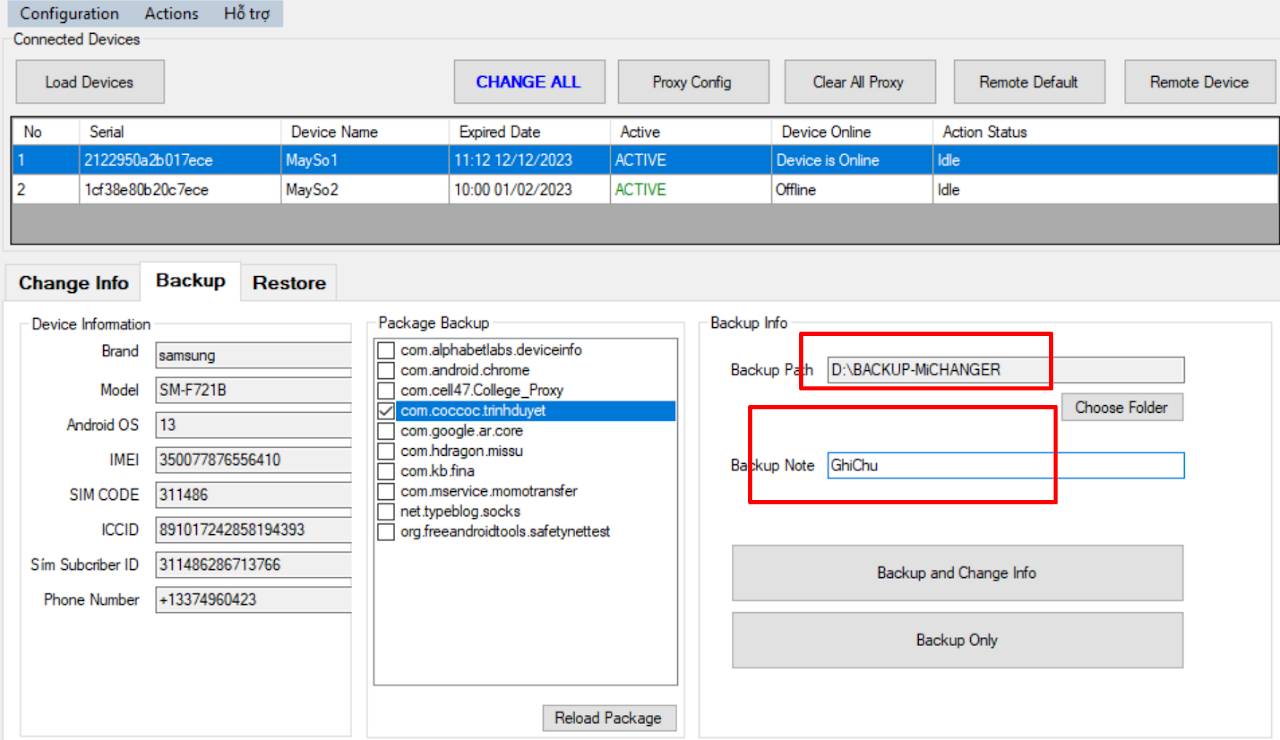
- NOTE: PLEASE DO NOT RENAME THE BACKUP FILE.
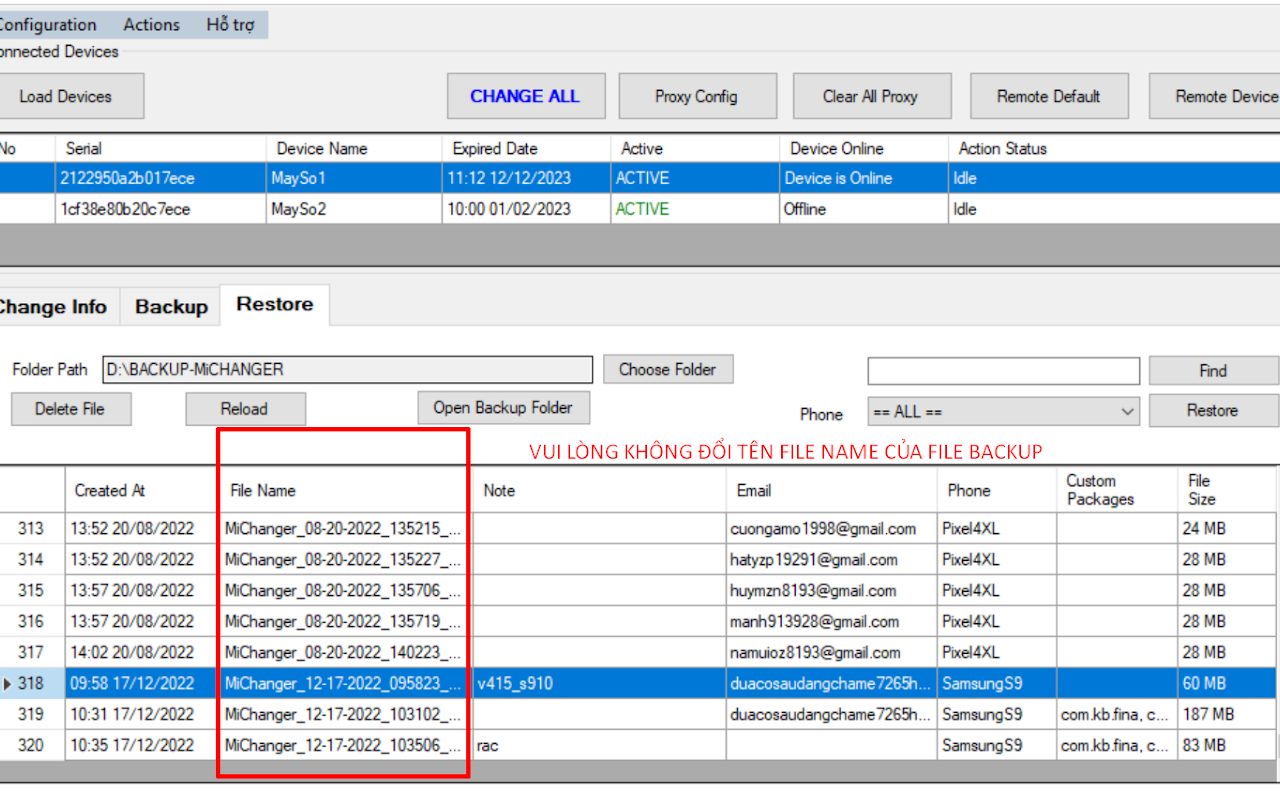
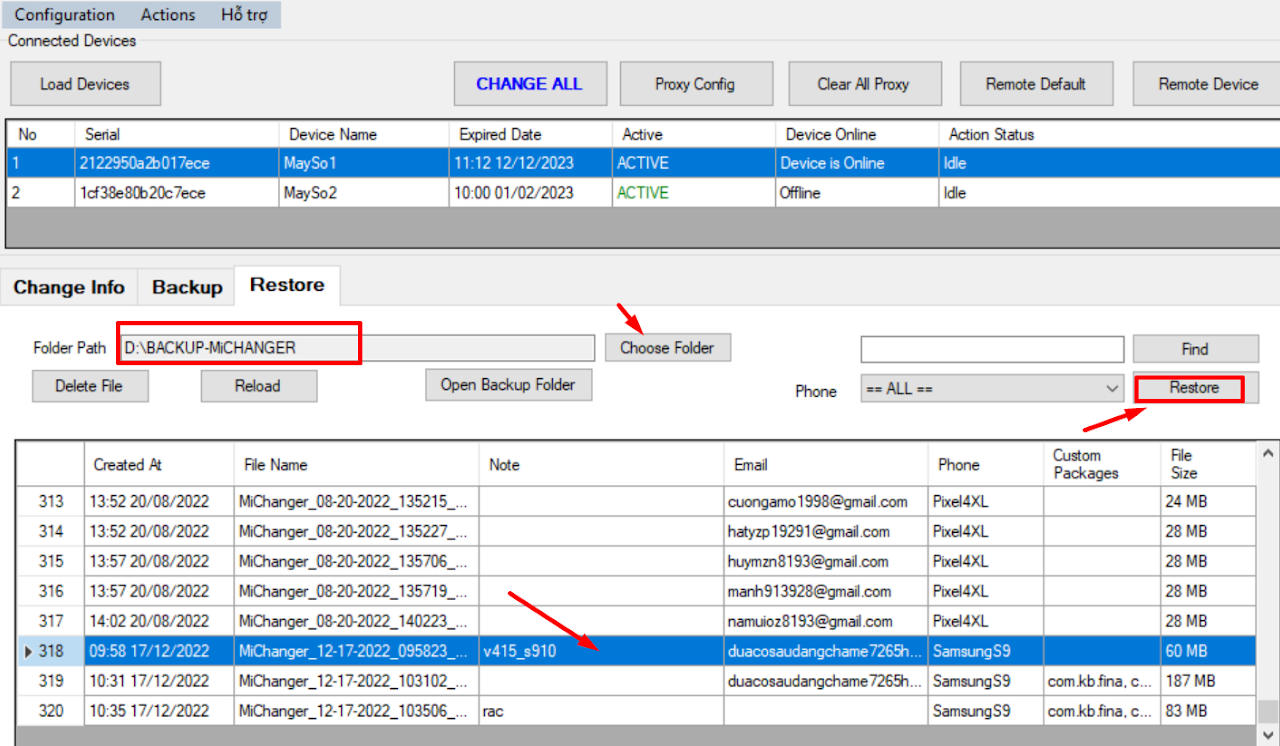
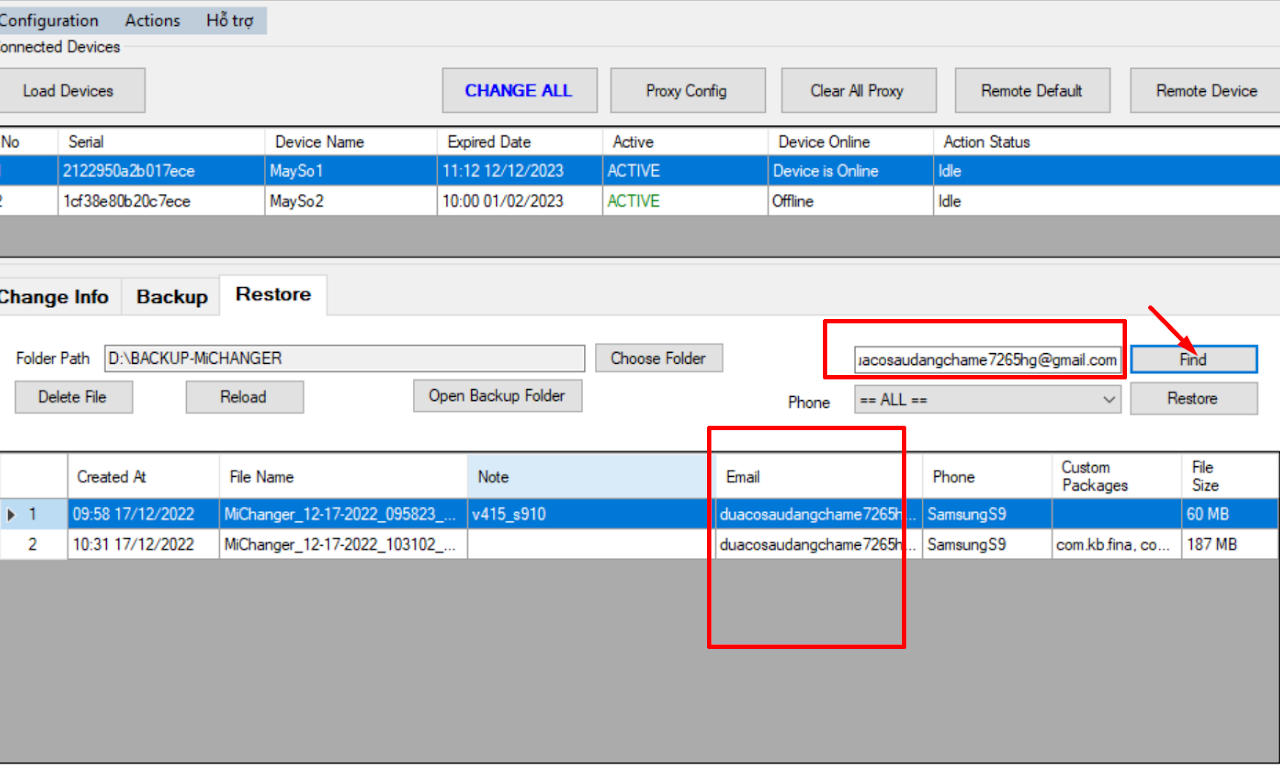
3. Restore Guide
-
Select the path containing the Backup file.
-
Select the file to RESTORE.
-
Click Restore for the tool to proceed with restoring that file.
- You can search for the BACKUP file by gmail name or NOTE.

V.Tools
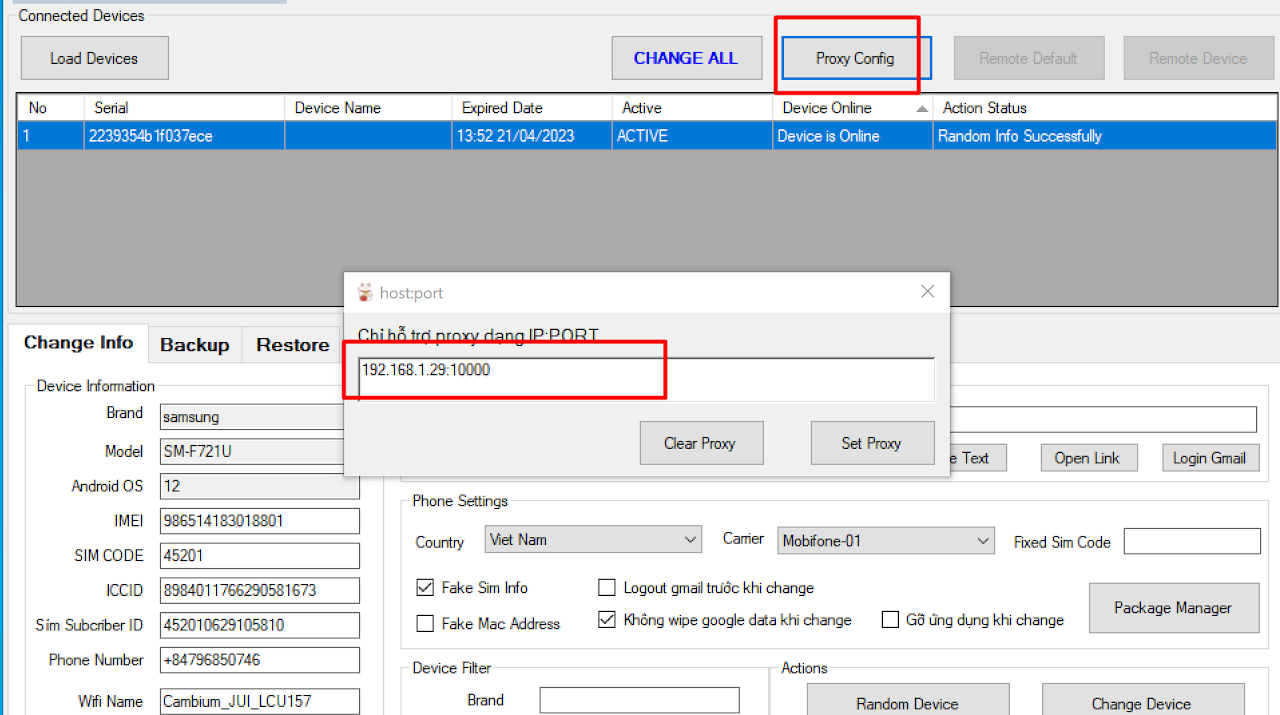
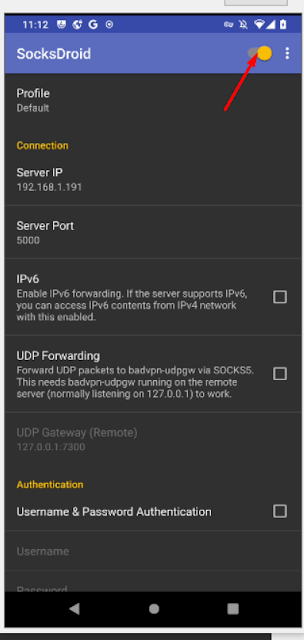
1. Proxy Config (SockDroid)
This function is similar to pointing a Proxy to wifi to fake IP for the phone.
- Note: Only supports
Server:Portformat (Does not support user/pass). - Pros: Fast port pointing.
- Cons: Can be detected by some apps.
2. Using PIASOCK5 (Sock5) - SockDroid
- Open SockDroid app on phone -> Enter
IP:Portof SOCK5.
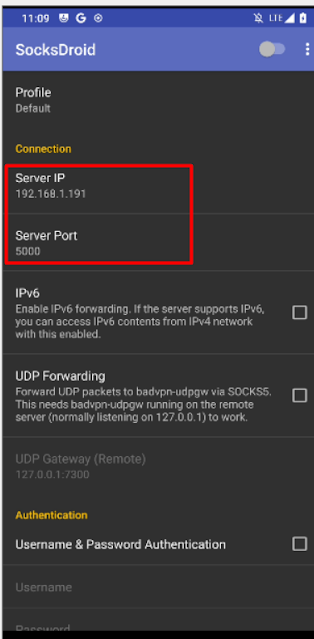
- Enter
USER/PASSof SOCK 5 (IF ANY).
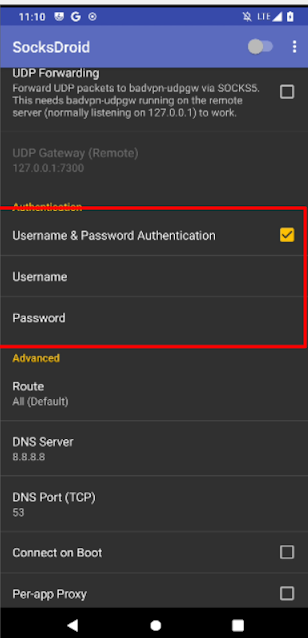
- Toggle the enable switch to turn on proxy.
3. Fake Mac Address
- This function is to Fake the WIFI Mac address of the phone.
- Note: Each time Mac Address is Faked, the WIFI router will assign a different LAN IP address to the phone.

4. Remove Google Account
- Tool runs auto removal of gmail from Phone Settings before Change/Restore/Backup.
- Purpose: Let Google know this device has signed out of gmail.

5. Install APK (Remote Device)
- Click Remote Device to display the phone screen.
- Drag the APK file from the computer into the Remote window (Note:
.apkfile, not.xapk).
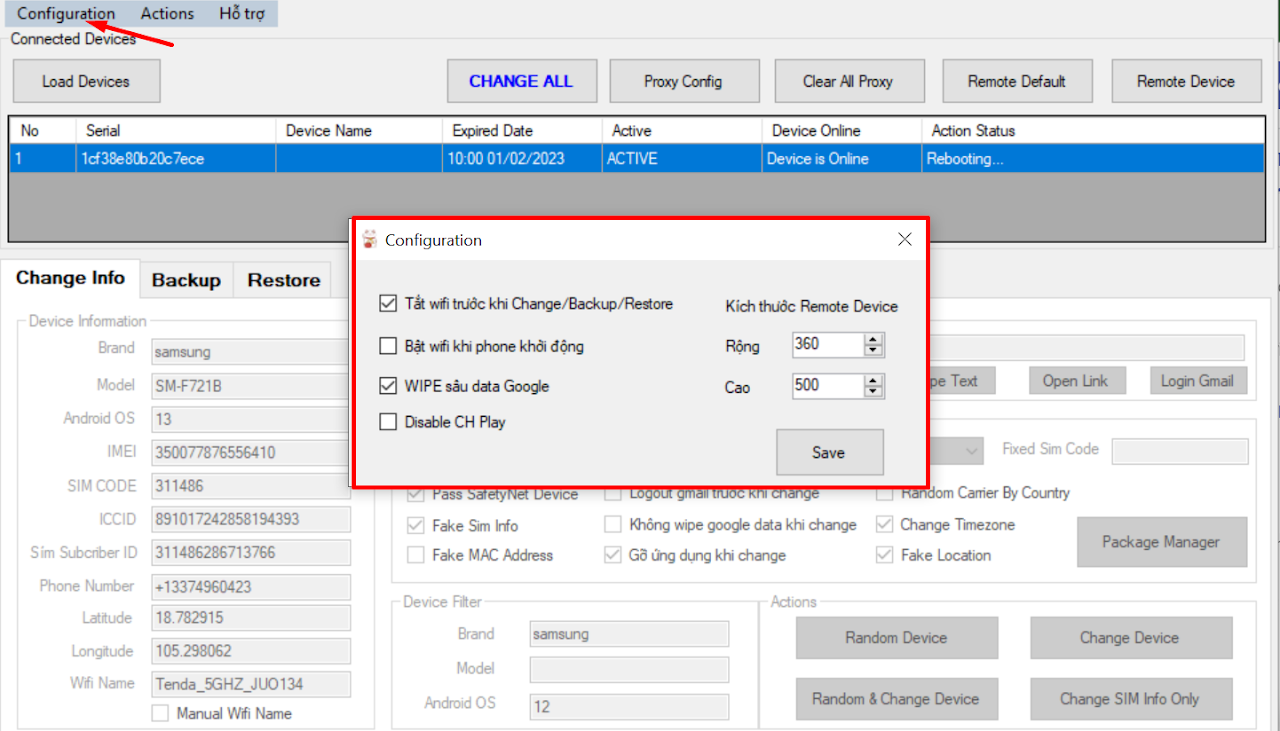
6. Configuration Options
- Turn off wifi before CHANGE/BACKUP/RESTORE: Disconnect network before operation to avoid detection.
- Turn on wifi before boot: Machine boots up with WIFI OFF -> Fake IP -> Then turn on wifi.
- Deep WIPE google data: Wipe cleaner (may cause app crash when first opened).
- Disable Play Store: Turn off Play Store, prevent background updates (Avoid app crash).
- Pass SafetyNet Device: Help pass Google check.
- Random carrier by country: Random network carrier by country.
7. Fake Location (Fake GPS)
Default tool will fake Random by country. If you want to fake by desired coordinates:
- Visit latlong.net to get coordinates.
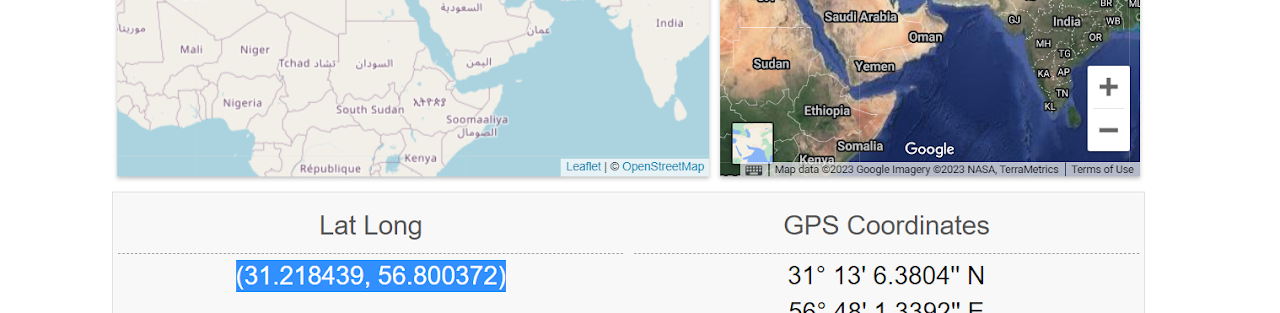
- On the tool, click Random Devices -> Enter coordinates into
LatitudeandLongitudecolumns.
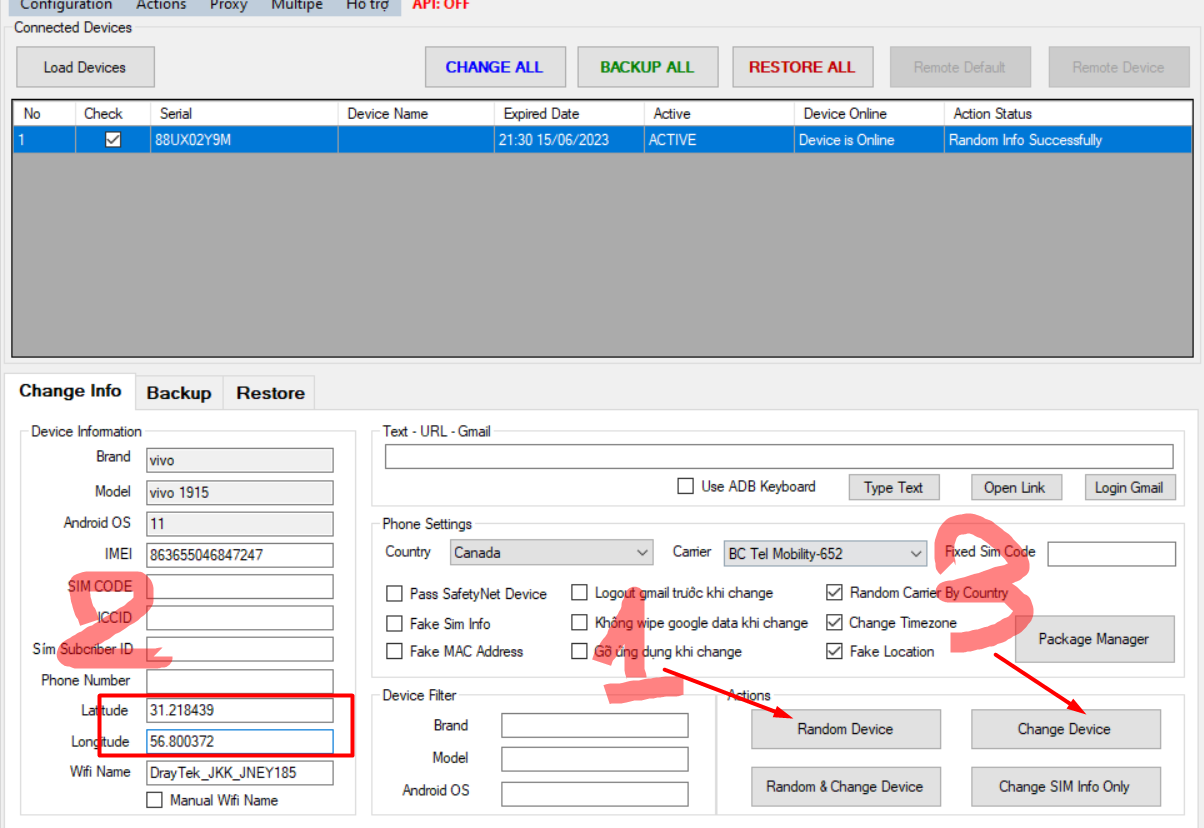
- Click Change devices.
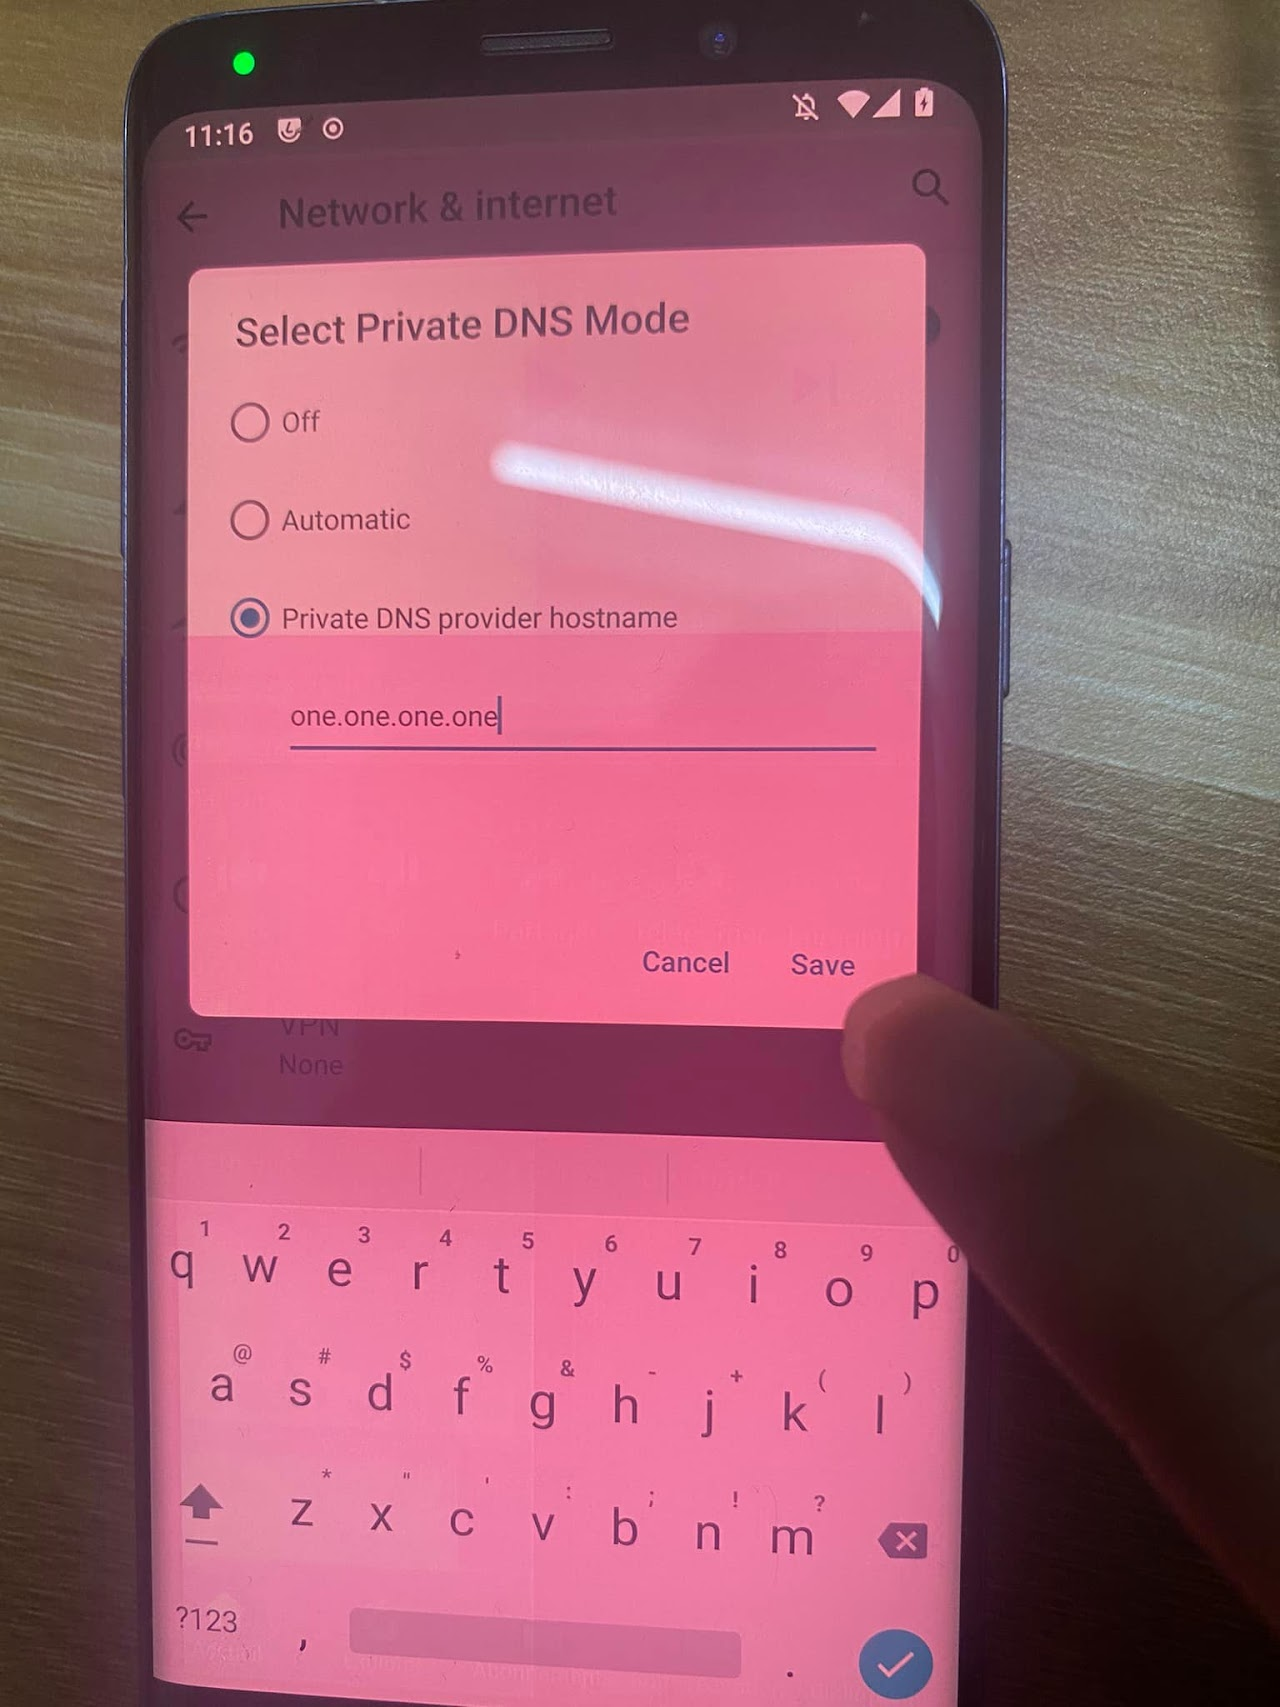
8. Fix DNS Leak
Go to Settings -> Network & Internet -> Advanced -> Private DNS -> Enter: one.one.one.one -> Save.
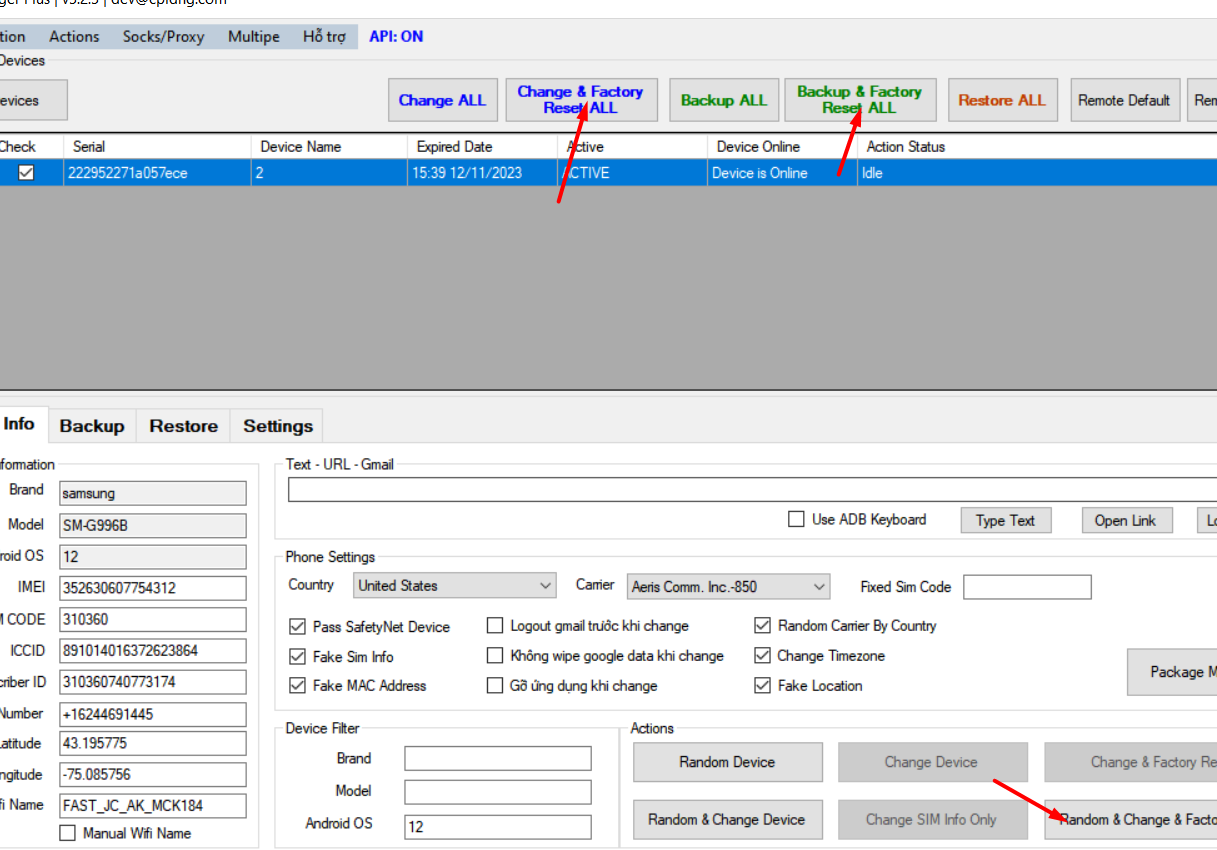
VI.Batch Functions (Batch Processing)
The ALL functions will operate on all connected devices:
- CHANGE ALL: Random & change info for all devices.
- BACKUP ALL: Backup all devices.

VII.Factory Function (Wipe Clean)
Factory means wiping all app data on the device (like unboxing new).
- Disadvantage: Deletes all apps on the device (should use with "Install APK after Change").
- Options:
- Random & Change & Factory: Random -> Change -> Factory.
- Backup & Change Info & Factory Reset: Backup -> Random -> Change -> Factory.
- Change & Factory Reset ALL: Do for all devices.
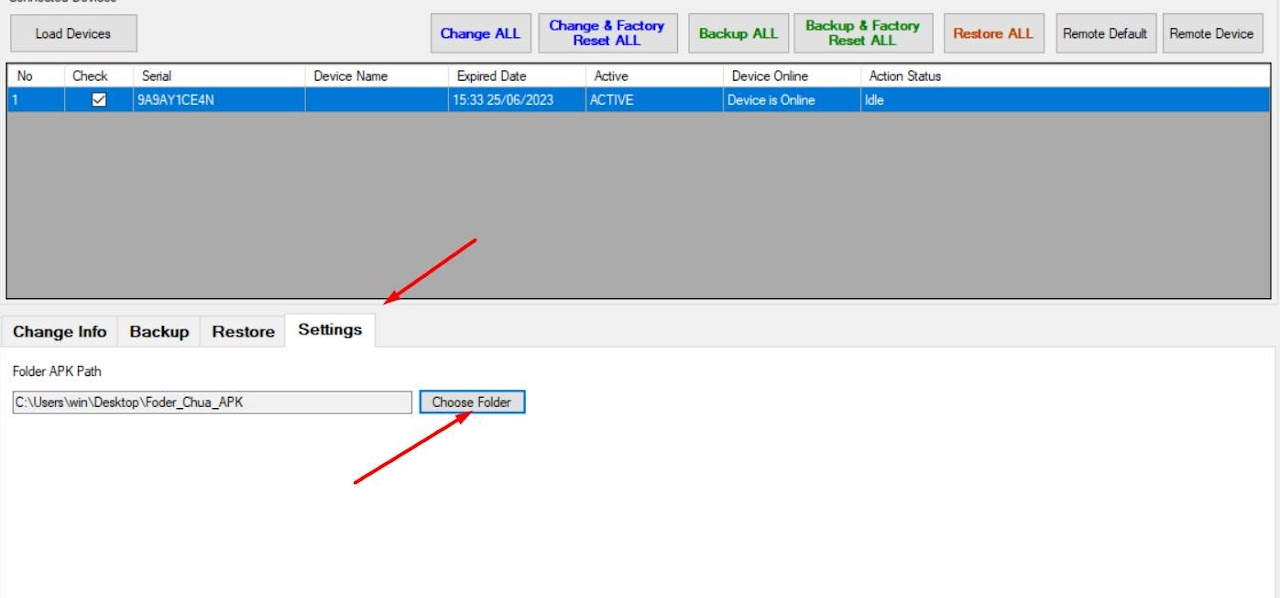
VIII.Install APK after Change
- Purpose: Re-install APK from computer after Change (especially when using Factory function).
- Example: Re-install latest Google Play Store to avoid crash.
- Download Google Play Store APK (file
.apk). - Put in a folder on PC.
- Point tool to that folder in configuration.
- Download Google Play Store APK (file
IX.Copy Data to Phone
- Swipe down notification bar -> Select File Transfer mode.
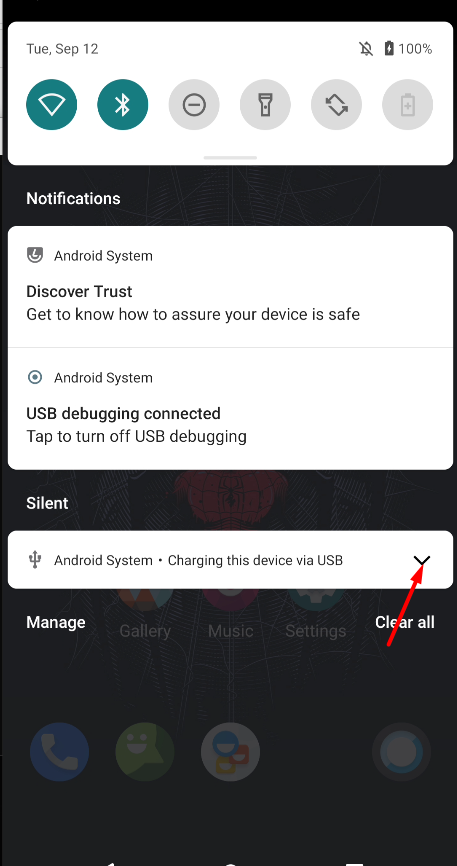
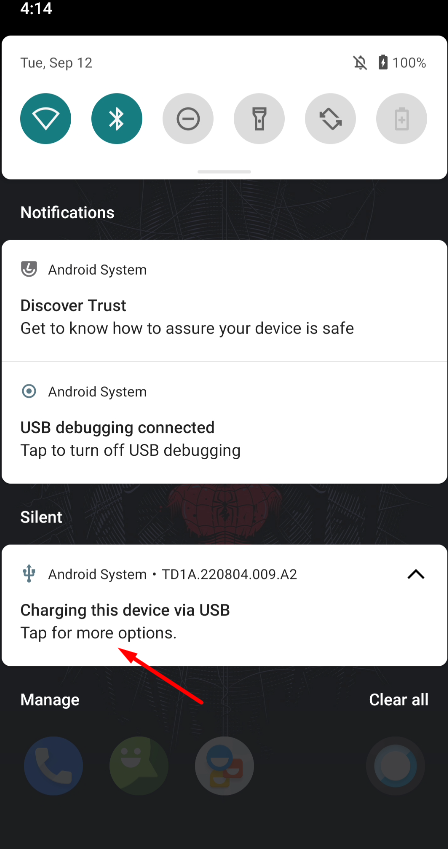
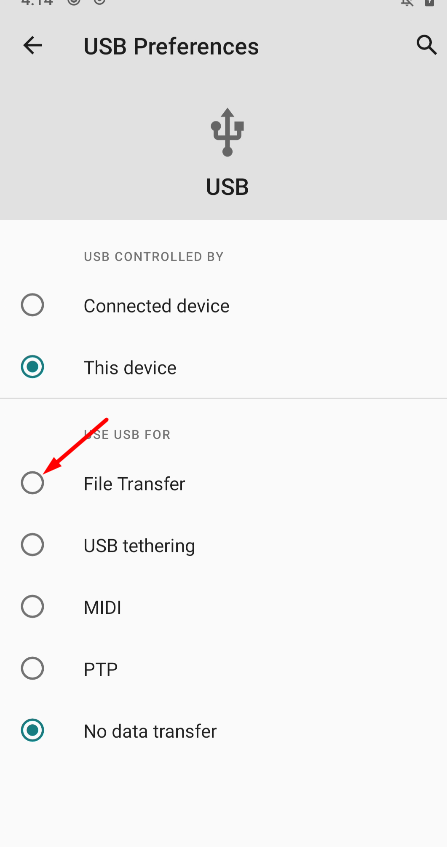
- Computer will show the phone drive.
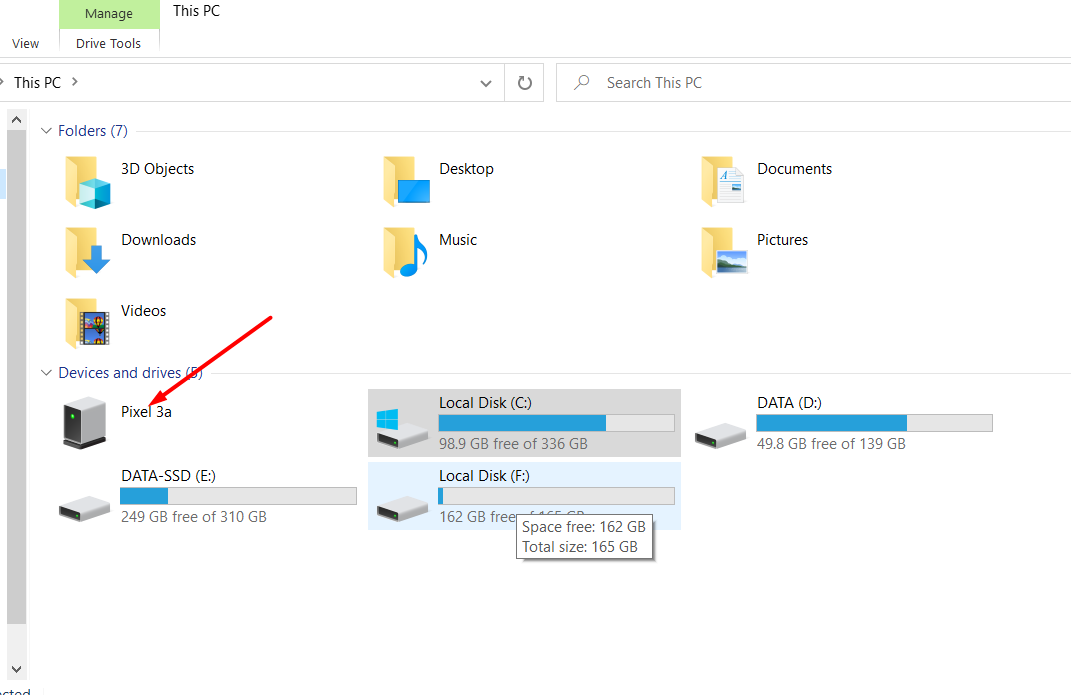
- Copy data from computer and put in (Usually
DOWNLOADfolder).
